Guide
Learn how to use PianoRoll effectively and explore all its features
Discover PianoRoll - Your New Space for Piano Growth & Community 🎹
Are you a pianist looking for inspiration, motivation, or a place to grow? Whether you're just starting out, a passionate amateur, a professional performer, or a piano teacher or student, PianoRoll was made for you.
🎼 What is PianoRoll?
PianoRoll is an online space created for pianists at every level. It's a supportive and inspiring platform where you can track your progress, share recordings, and receive visual feedback. Designed for both teachers and learners, it helps you organize your practice and connect with others.
✨ Here's what you can do on PianoRoll:
-
Upload your piano recordings and visualize them as interactive piano rolls
-
Track your progress over time
-
Receive feedback and comments from others
-
Participate in challenges and contests (with prizes!)
-
Connect with teachers, students, and fellow pianists
-
Explore statistics and insights from your recordings
-
Build a musical diary you'll be proud of
Ready to join us? 🎶
Explore PianoRoll today and become part of a unique community built by and for pianists.
🎹 How to Post on PianoRoll
Sharing your music on PianoRoll is easy and flexible, whether you're capturing the moment or uploading something you've already recorded. Here's what you need to know:
🎵 1. What to Record?
Anything and everything! If it comes from your piano, it belongs on PianoRoll. Here are some common types of posts you might record:
Practice sessions
- A full practice session - complete with warmups, repetition, and mistakes
- Short excerpts from a practice session - like tricky passages you're working on or moments you want to revisit later
Performance recordings
- A finished piece you're proud of
- A personal improvisation
- Your own composition or arrangement
- A musical idea in progress
🎧 2. Upload a Recording
Already have a recording setup? You can record your instrument using any method - whether capturing audio with a microphone or phone, or recording MIDI via USB or Bluetooth. Once your file is ready, upload it to PianoRoll to create a new post.
Read more 👉 Upload section
🎙️ 3. Record on PianoRoll
Want to share something in the moment? If you have a MIDI instrument or a microphone connected to your computer, you can record directly on PianoRoll and we'll create a post when you're finished.
Read more 👉 Record section
📝 4. Post Details
Each upload becomes a post where others can listen, comment, and follow your musical journey.
- Add a title, description, and tags to make it easier for you to organize your archive.
- Engage with your audience - receive feedback, share updates, and build your community.
- Set your privacy - decide whether your post is public or visible only to you. It's your choice to share openly or keep it private for personal reflection.
-
It's your space - express yourself freely in a supportive, piano-focused environment.
Read more 👉 Your post details
📁 Option 1: Upload a Recording
-
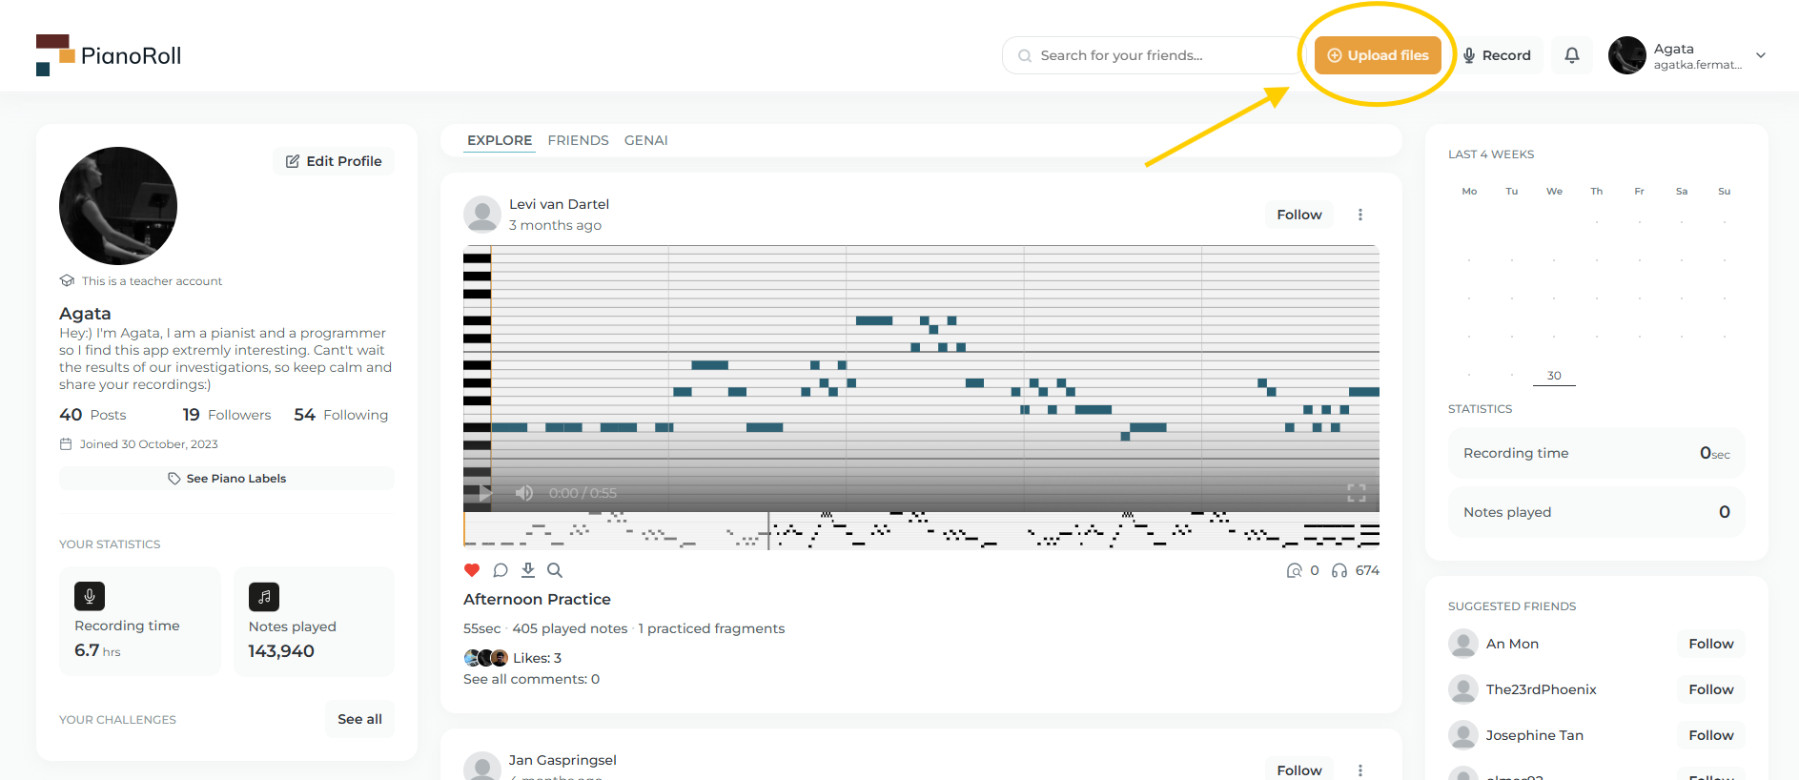
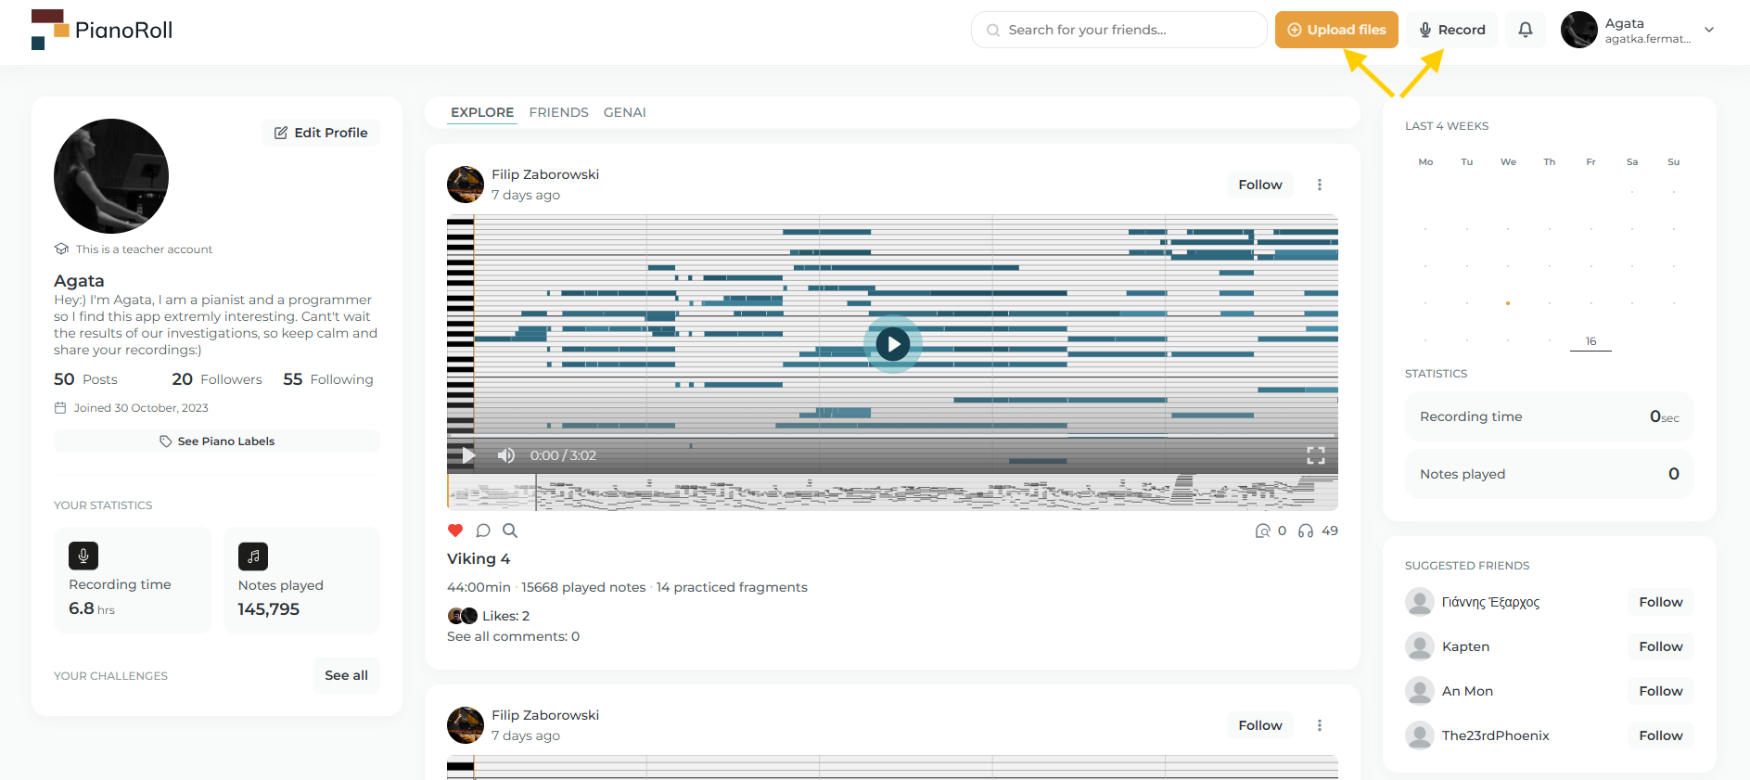
When you are logged to your PianoRoll account click at the top section Upload files button or select the "Add a new piano session" tab and then Upload Files.
-
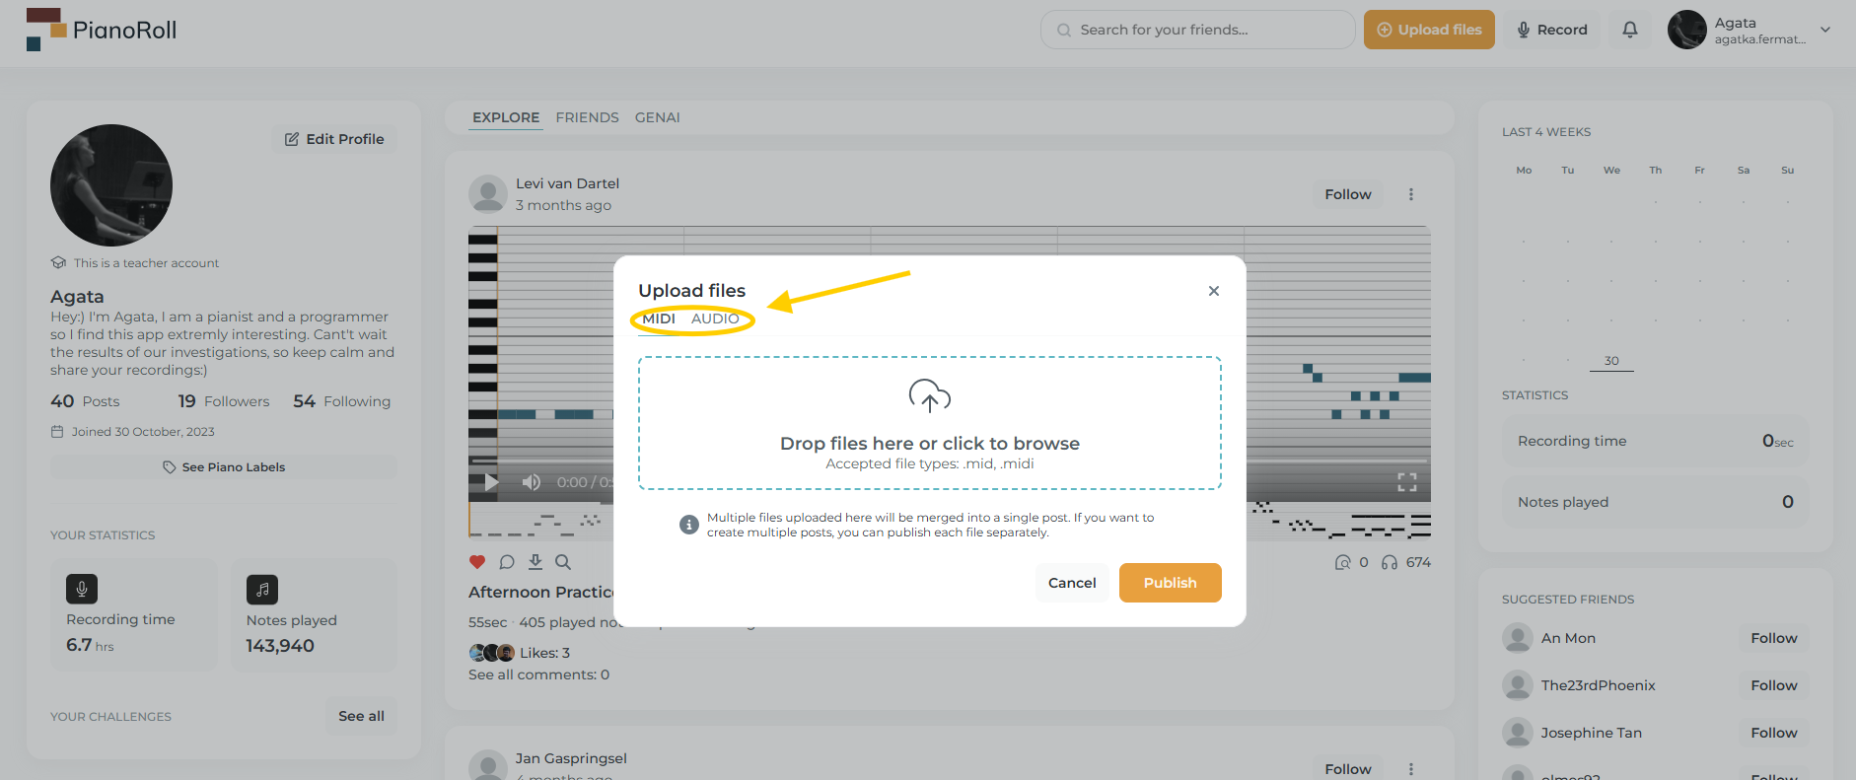
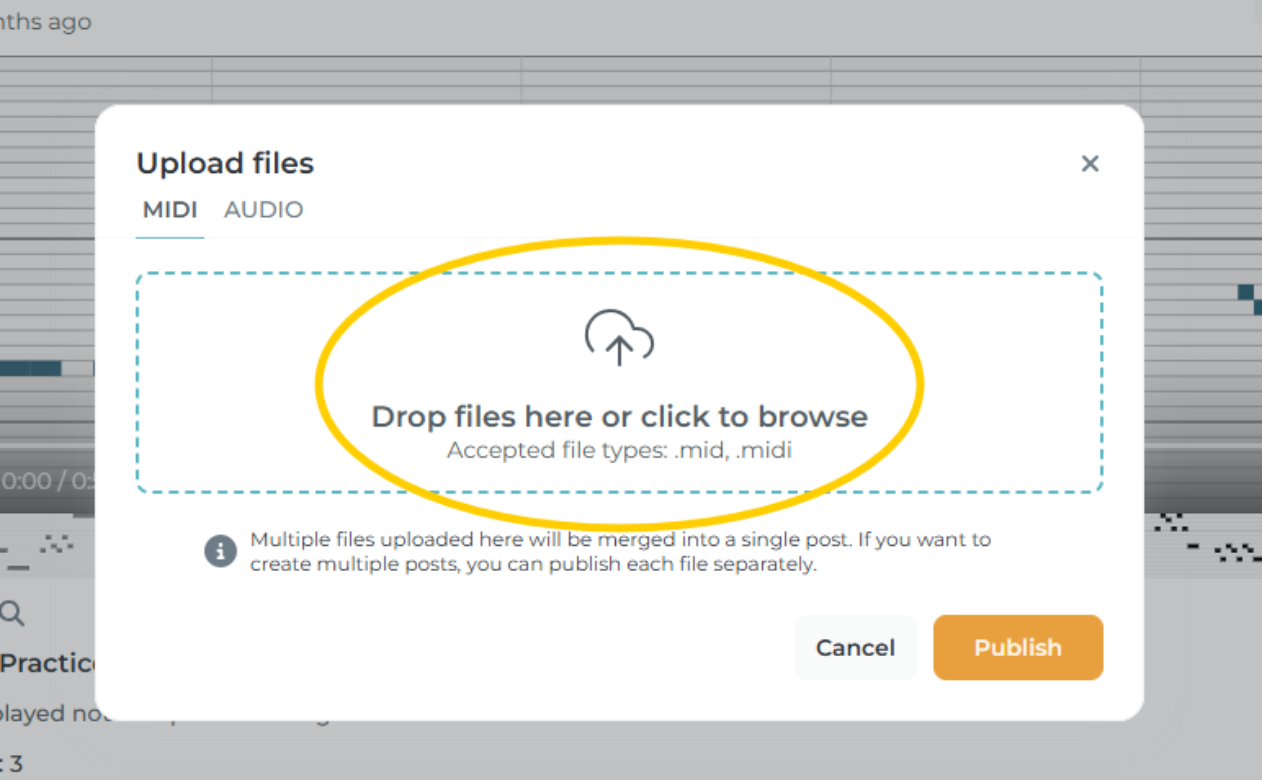
Select the file(s) from your computer - it could be a practice session, a full piece, improvisation, or original composition.
-
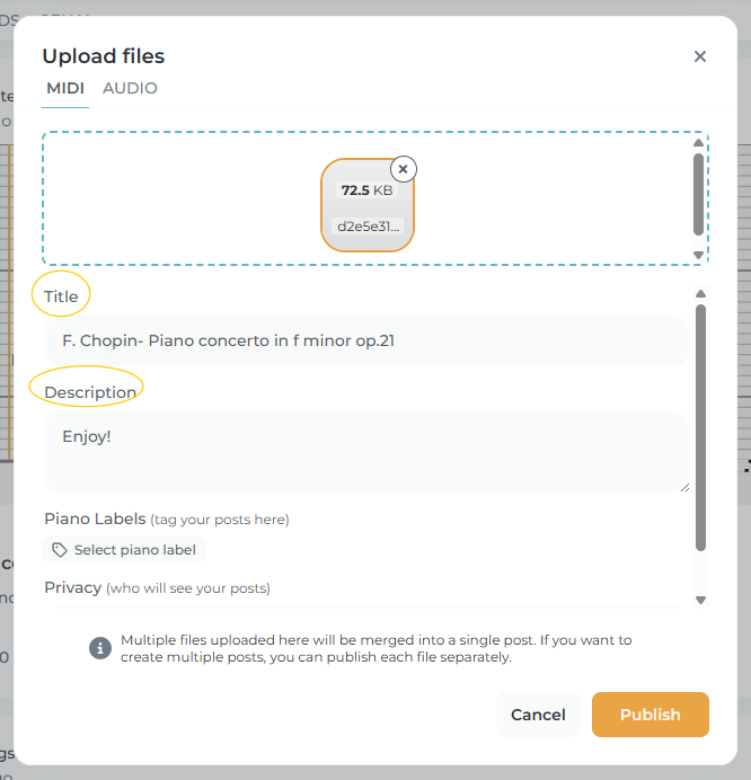
Add a title and description to tell your story.
-
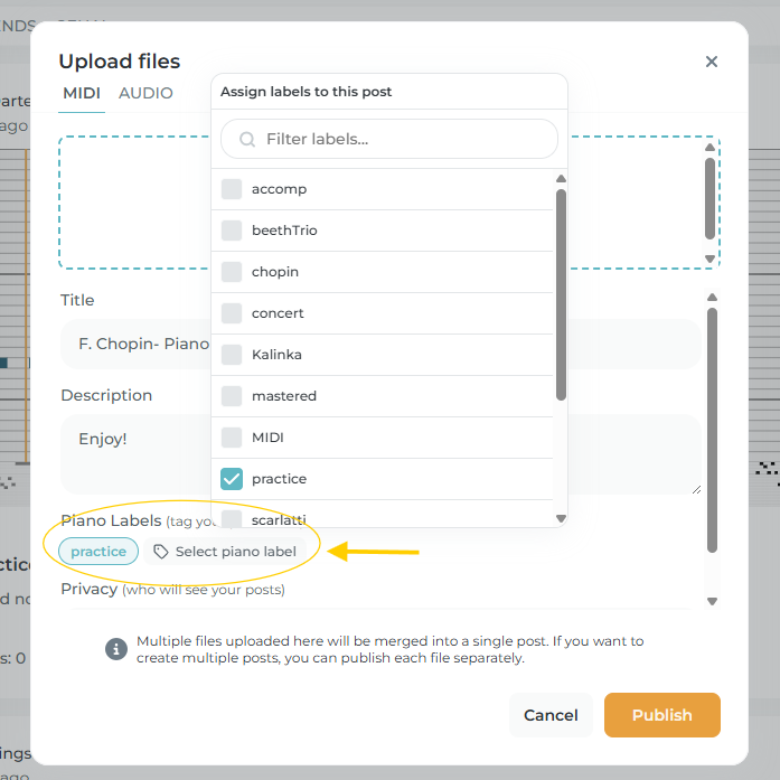
You can also add your Piano Label to keep your recordings in order (read more about 👉 Piano Labels.
-
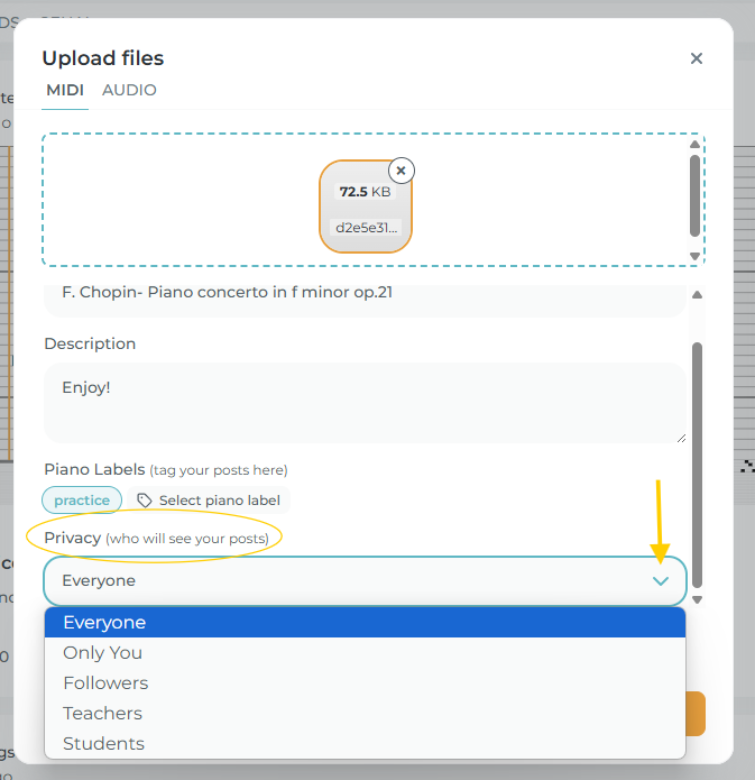
Set your privacy settings - decide whether your post is public, private, or visible to selected users only.
-
Click Publish and you're done!
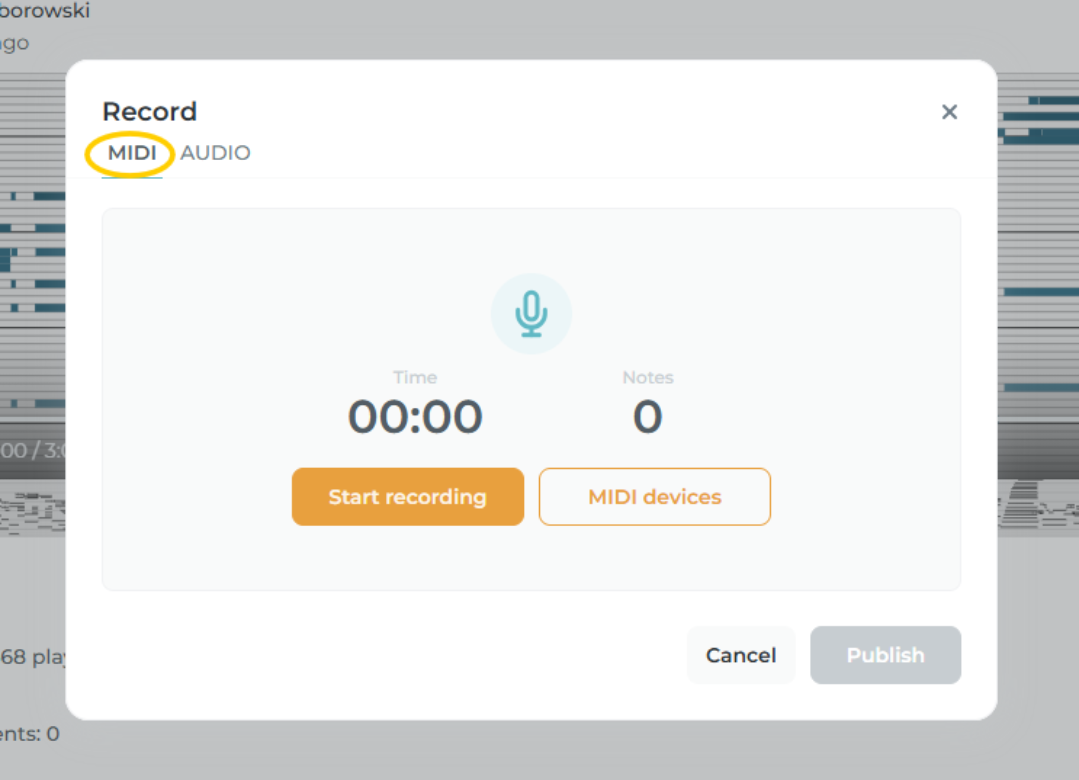
🎙️ Option 2: Record Live (MIDI or Audio)
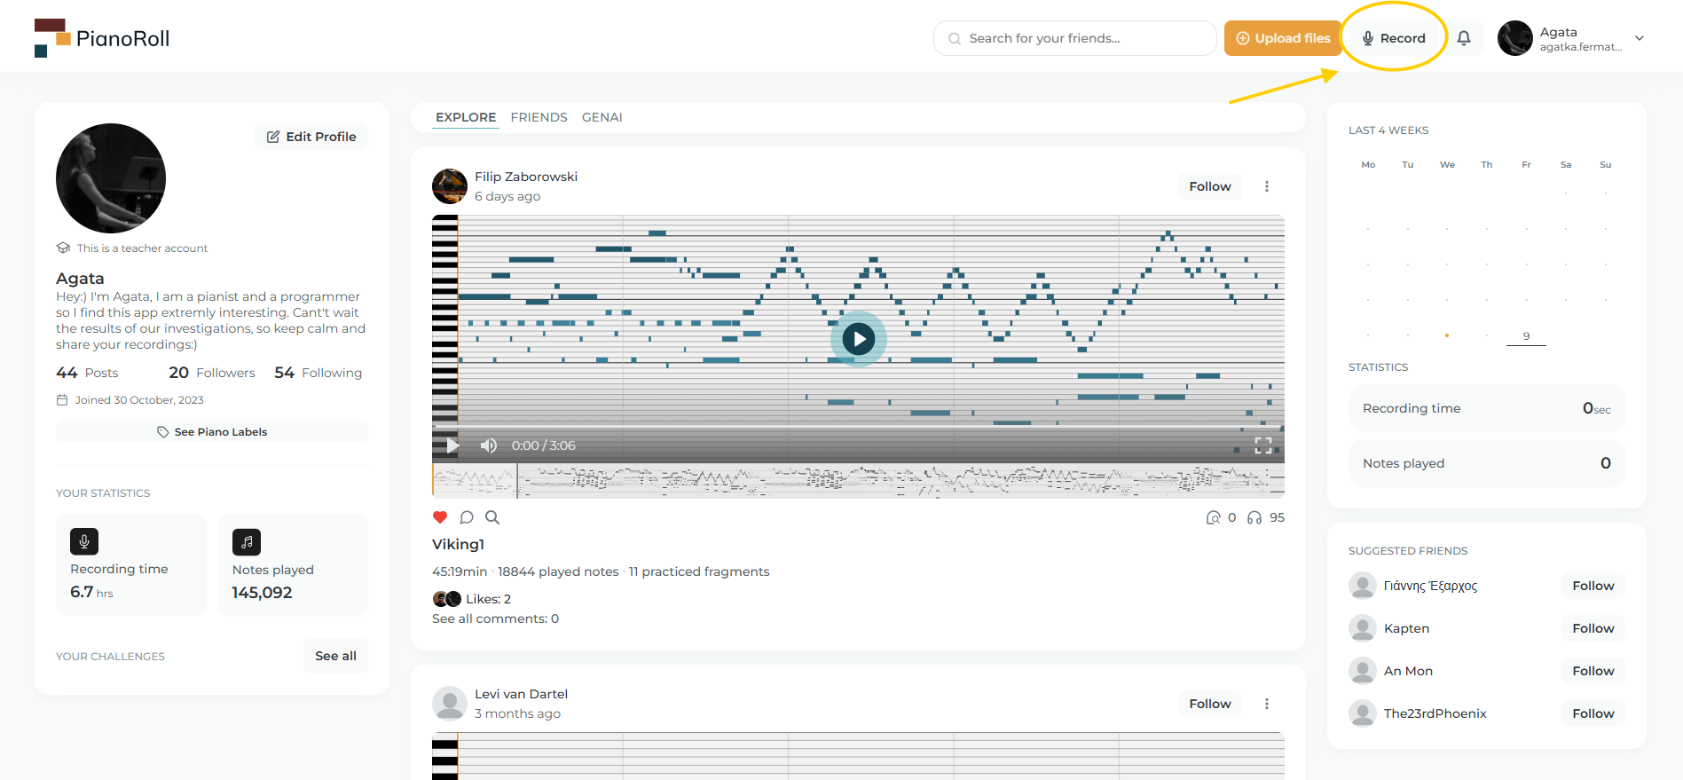
-
Click the “Start recording” button in the top bar.
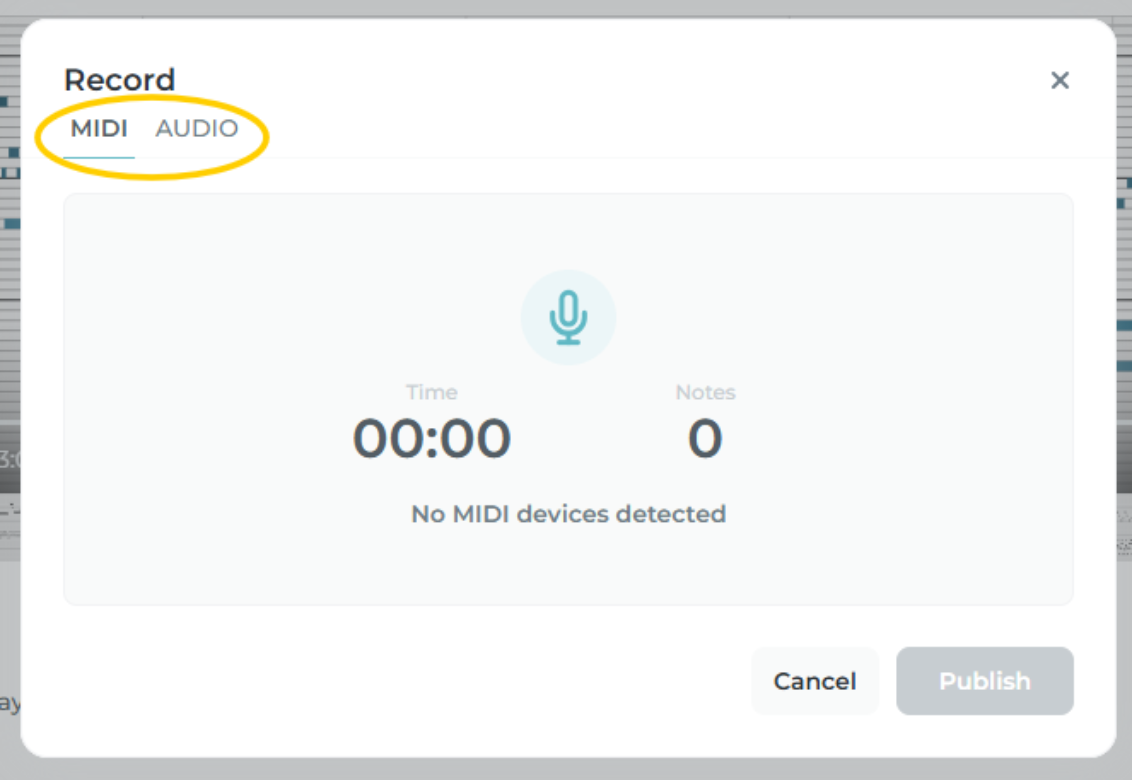
-
Choose between MIDI or Audio recording.
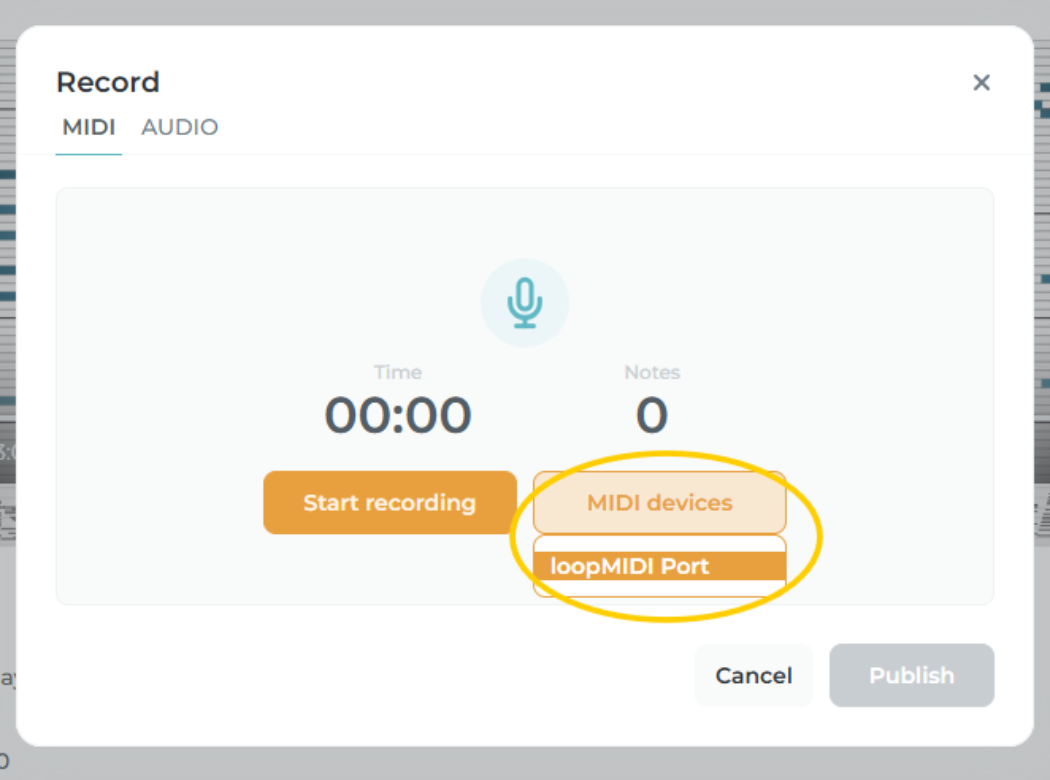
🎹 For MIDI:
-
If you have a MIDI keyboard, just connect it to your computer (via USB or MIDI interface).
-
PianoRoll will automatically detect your device.
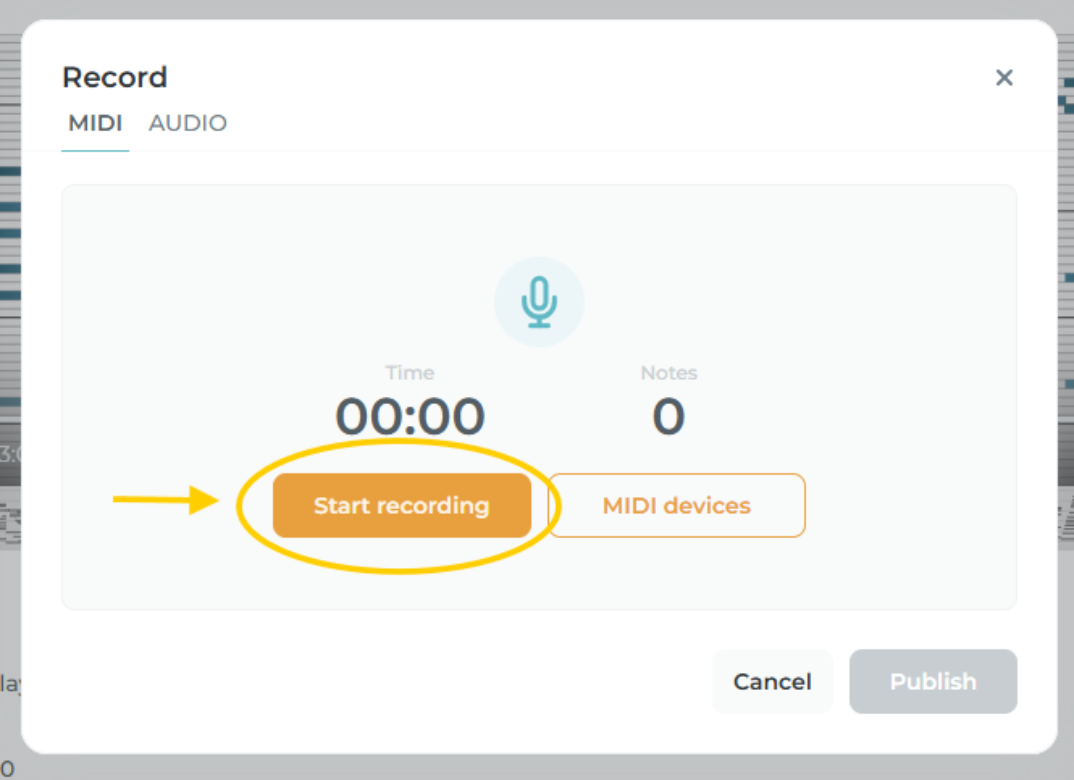
-
Click “Record” and play!
-
Once you've finished, click “Stop Recording”, add a title and description, and create your post.
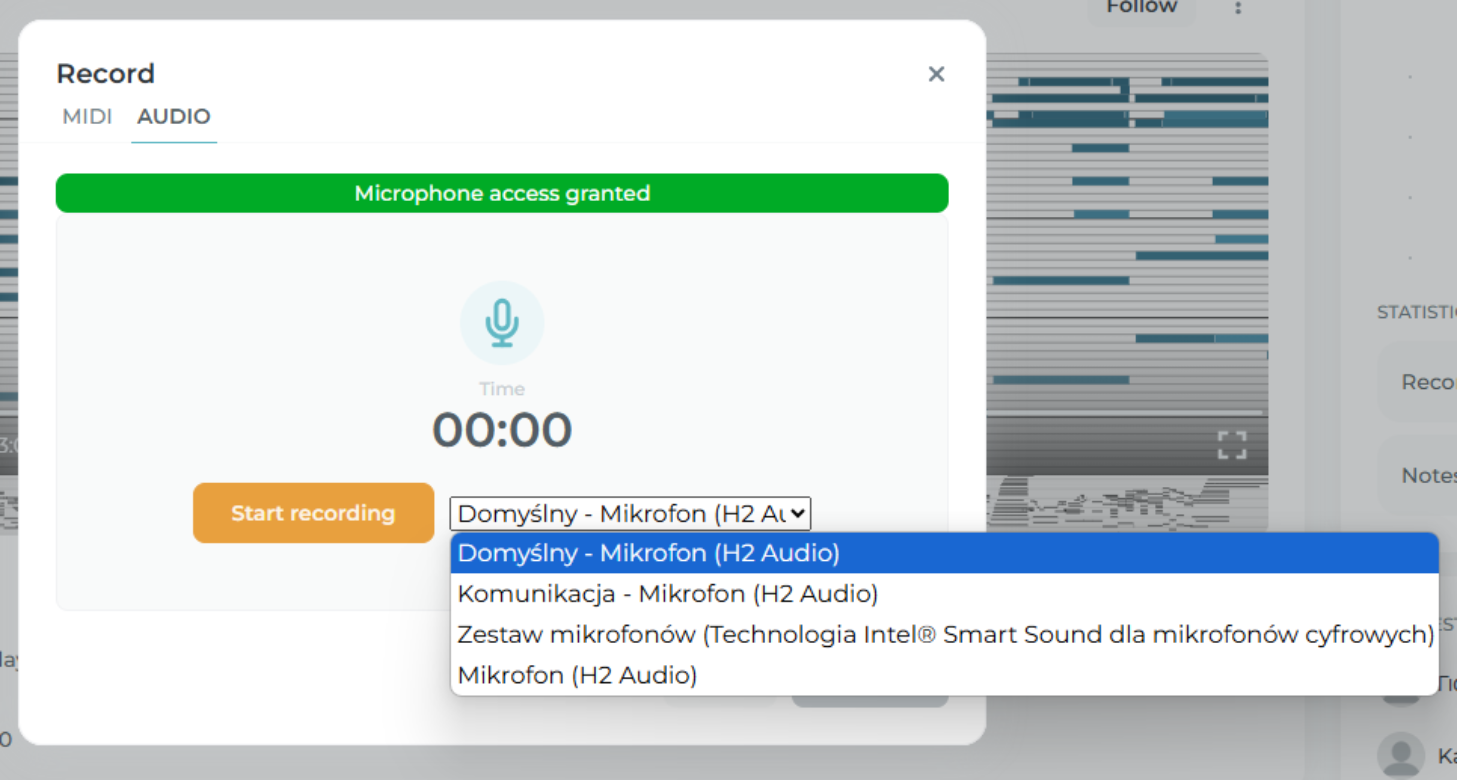
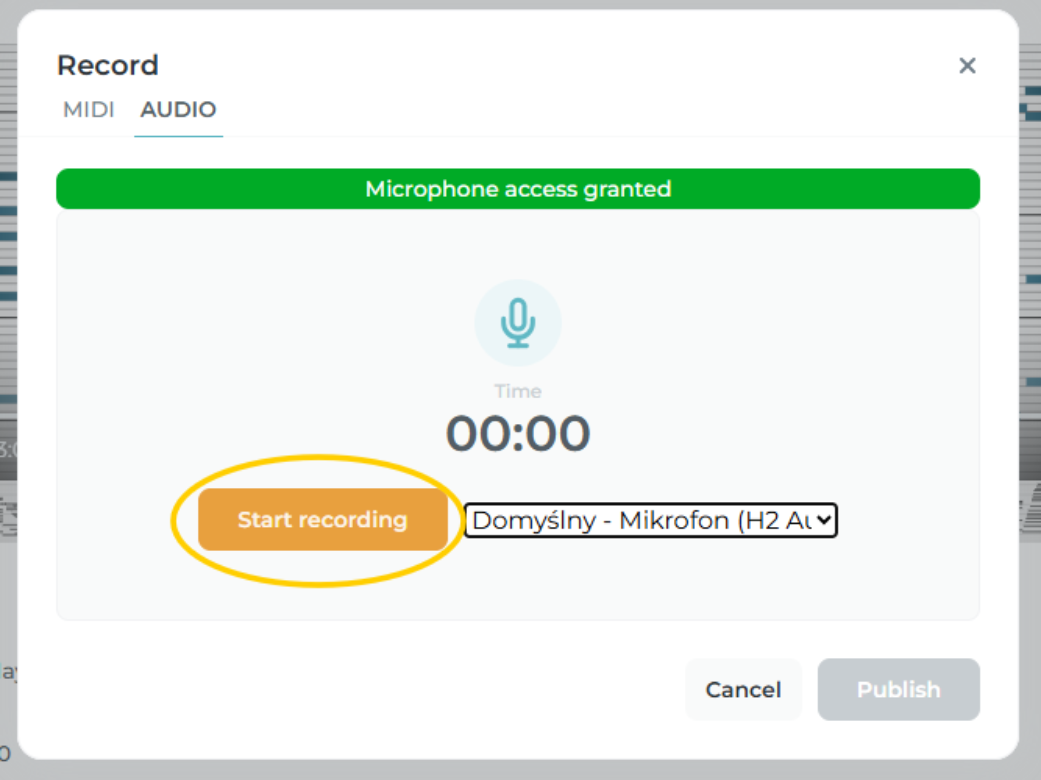
🎧 For Audio:
-
Use your built-in mic or, for better sound quality, we recommend professional recording equipment (like USB microphones or audio interfaces).
-
Click “Record” to play live.
-
Then click “Stop Recording” when you're done.
-
Click “next” to go to recording details.
-
As with MIDI, fill in your post details and publish.
🎹 Your post details!
When you add a new recording, you can make it stand out by including:
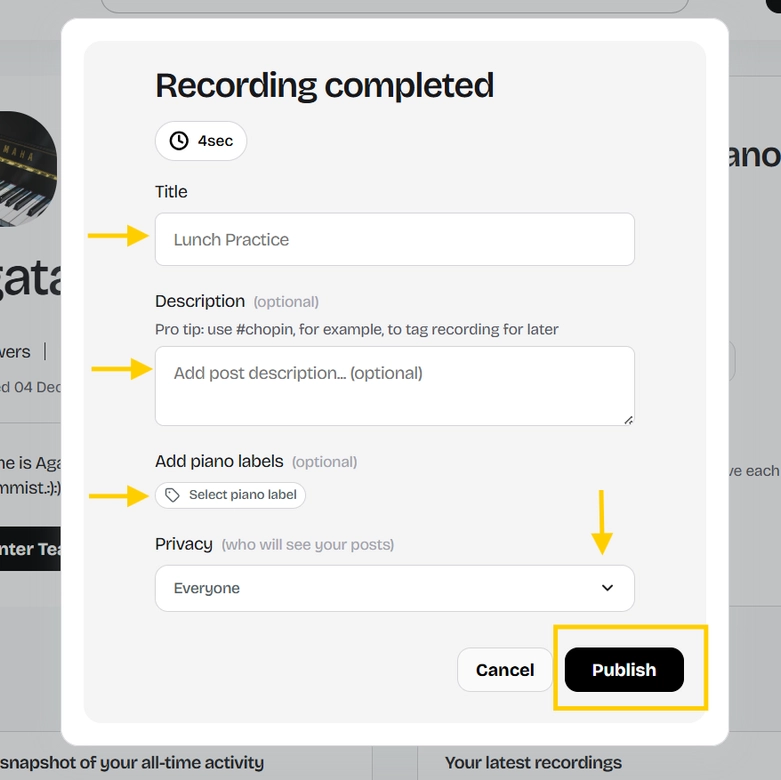
-
Title
Give your piece a name. It can be the actual title of the work or something creative that makes it unique.
-
Description
Write a few sentences about your recording. Share what you practiced, describe a challenge, or celebrate a live performance.
-
Piano Labels
Use tags to highlight your recording. Create new ones or pick from existing labels.
Read more 👉 Piano Labels -
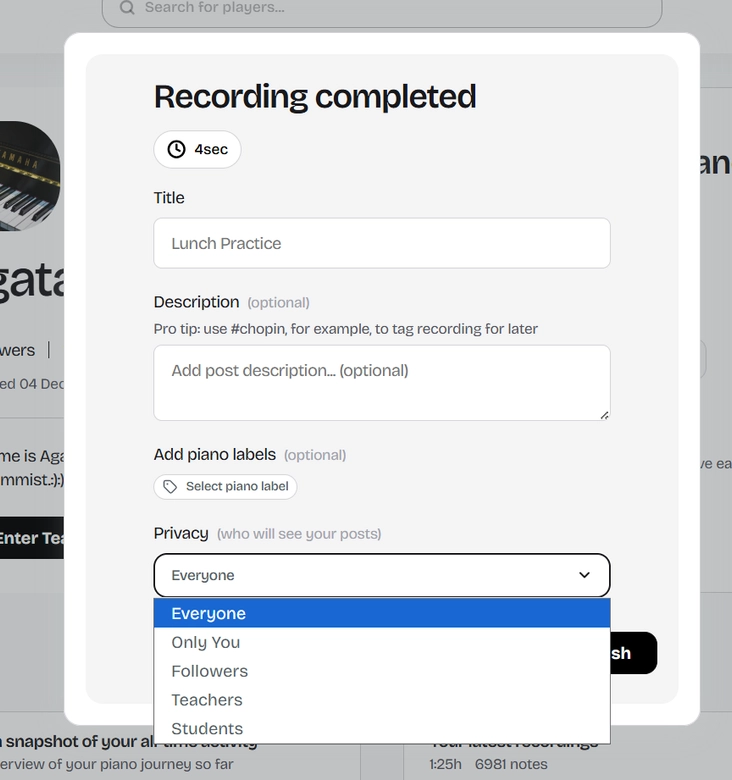
Privacy
Decide who can see your recording.
✨ Once everything is set, click Publish- and your post is live! 🎶
👤 Your PianoRoll Profile - Make It Yours
After creating your account, we encourage you to edit your profile and make it reflect you as a musician.
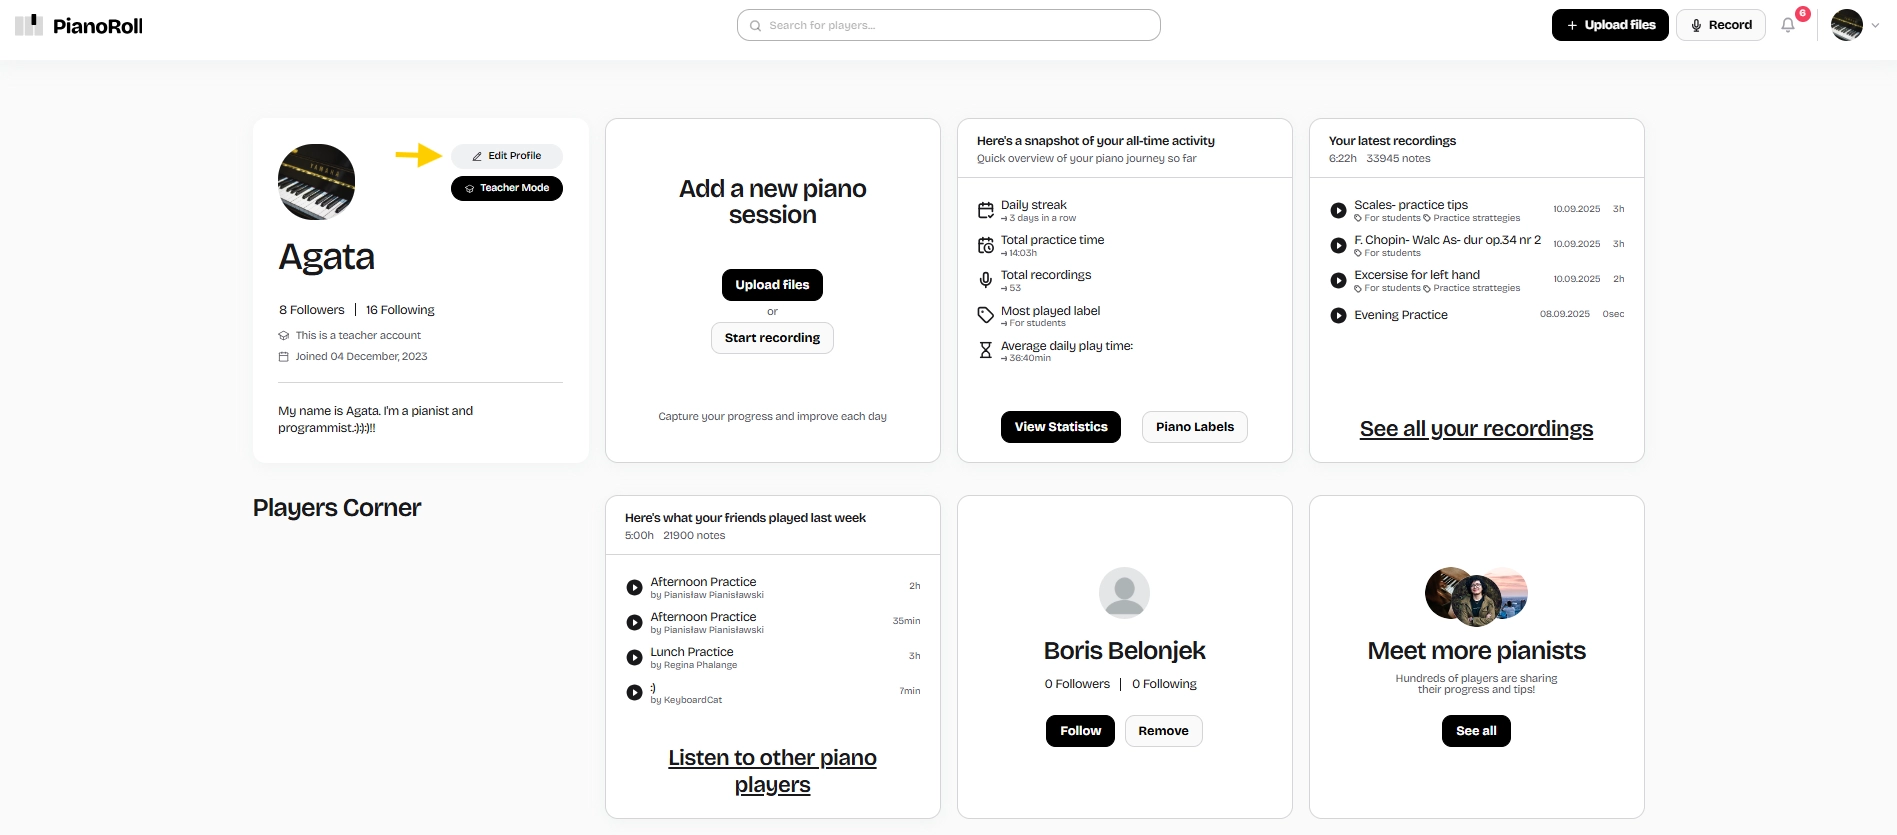
Here's what you can do:
📸 Upload a photo or avatar - let the community see who's behind the music.
📝 Add a short bio - share something about yourself: your piano journey, favorite composers, or anything that makes you stand out.
🔤 Choose your display name - it can be your real name or an artistic nickname.
✨ Personalize it - this is your space in the PianoRoll community, so make it feel like yours!
🔒 Default Privacy Settings
While editing your profile, you can also choose who can see your future posts by default:
- Everyone
- Followers only
- Only you
- Teachers
- Students
Of course, you can always change the visibility of each post when uploading or recording. You stay in control.
🤝 Connect Through Music - Social Features on PianoRoll
PianoRoll isn't just a platform. It's a community. Here, pianists of all levels come together to inspire, support, and grow alongside each other.
Here's how you can interact with others:
🎧 Listen - Discover recordings from other users: classical pieces, improvisations, original compositions, practice moments, and more.
💬 Comment - Share your thoughts, give feedback, or simply say “beautiful playing!” Comments are a great way to connect and encourage others.
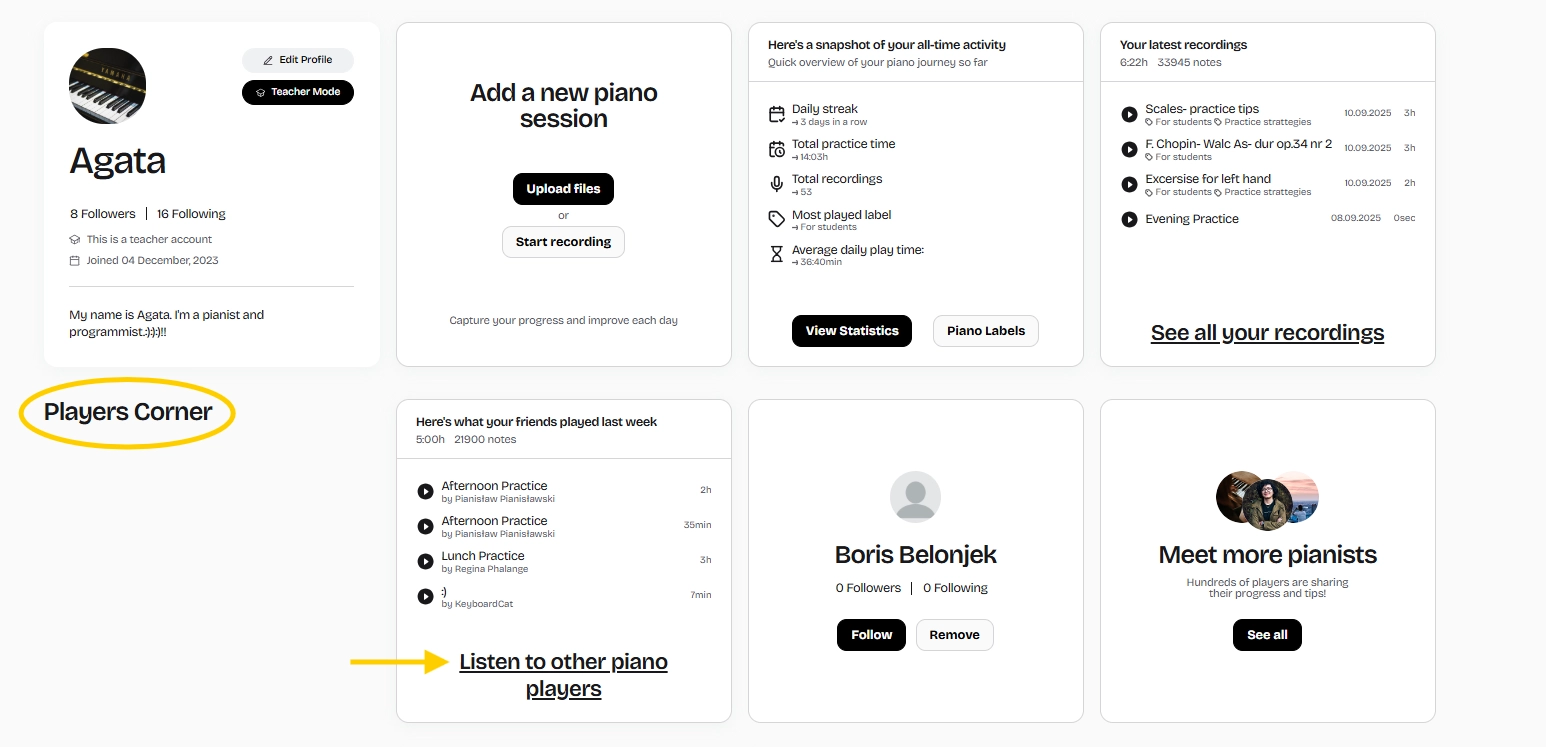
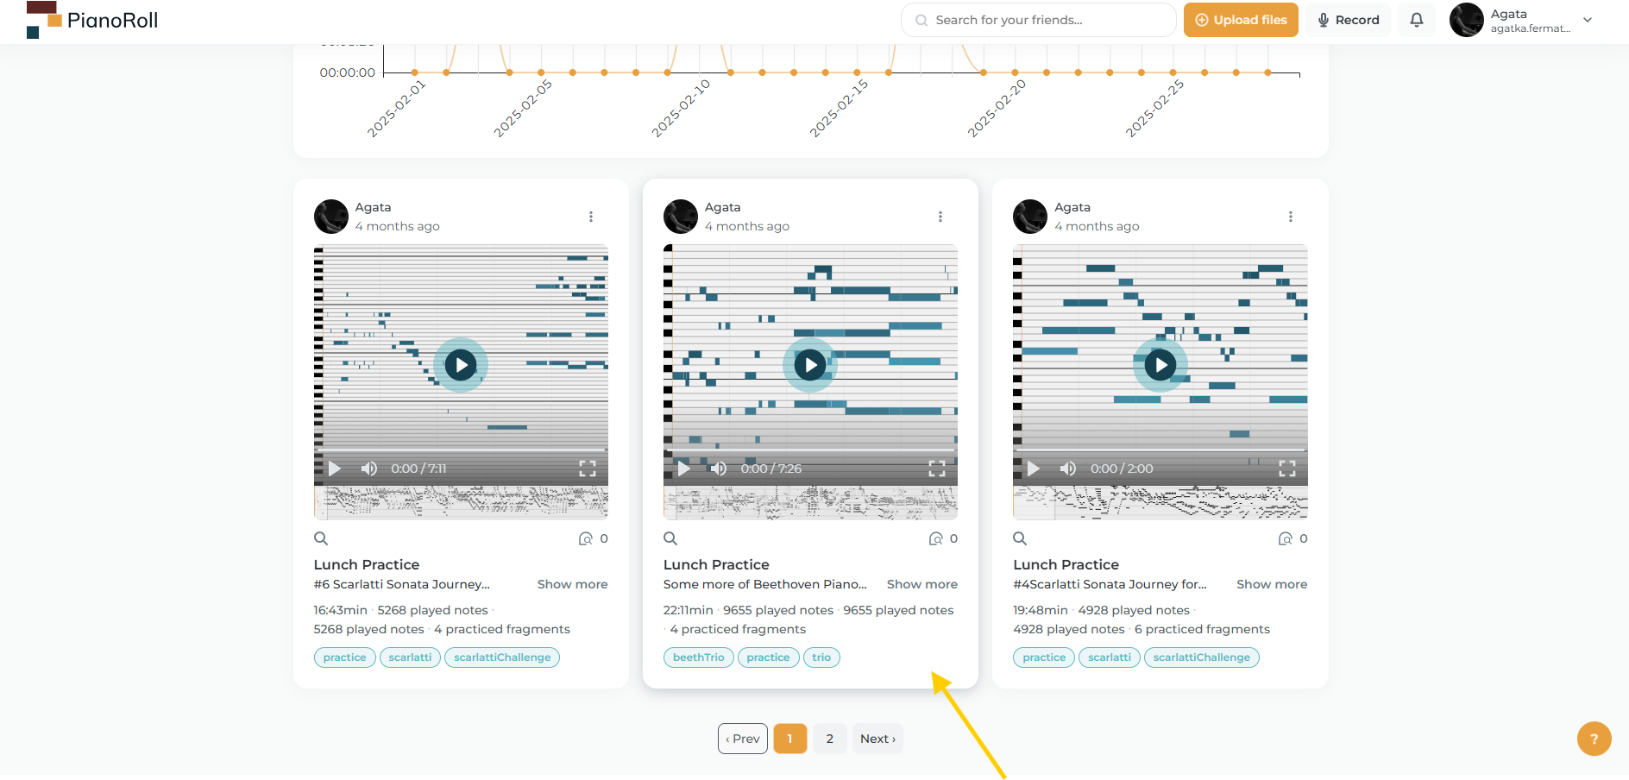
To see posts from other app users, go to the Players Corner section and then click Listen to other piano players.
You can comment in two ways:
1. General comments appear below each post and are visible to everyone who can view the recording.

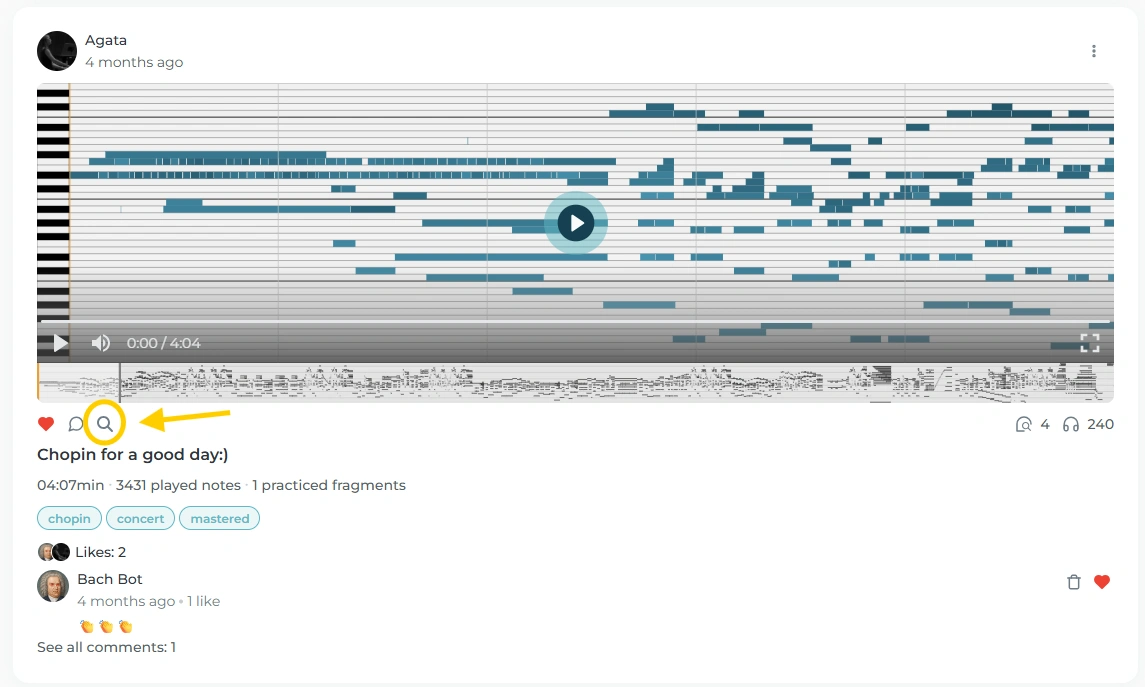
2. For detailed feedback, click the magnifying glass icon 🔍 to open the full PianoRoll view.
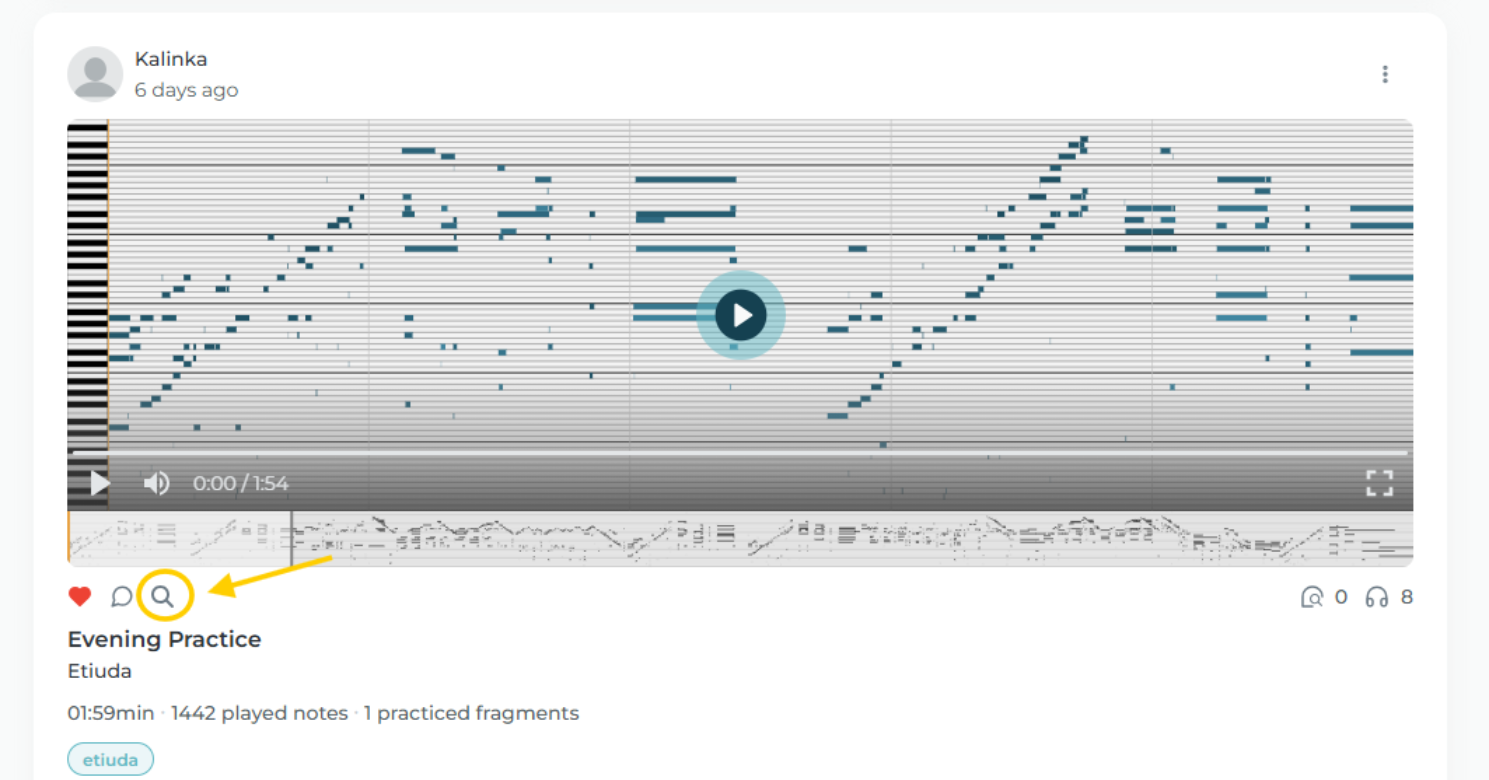
There, you can click directly on the roll to leave a comment on a specific moment in the recording ( 👉 read more about detailed feedback in Teaching section). Whether you want to praise a particular passage, ask a question, or, as a teacher, give precise guidance, this feature is made for you.
❤️ Like - Show appreciation for music that moves you. A simple like can go a long way.
👥 Follow - Stay updated with pianists you admire and build your own audience.
Every post is an invitation to connect. Whether you're a student, a teacher, or someone who just loves the piano. The more you engage, the more you'll get back. PianoRoll is about growing together through shared music and mutual inspiration. 🎹💫
🎓 A Space for Teachers & Students
PianoRoll is more than just a platform for sharing music. It's also a powerful tool for teaching and learning piano.
Whether you're a teacher guiding students or a student tracking progress, PianoRoll makes the learning process more engaging and effective.
👩🏫 For Teachers:
- Create a profile where students can follow your updates and performances
- Use PianoRoll posts as a way to assign tasks, track progress, or give feedback
- Listen to student recordings and leave comments with suggestions or praise
- Build a private or public archive of exercises, pieces, and teaching materials
- Organize class challenges and group activities
- Stay connected and motivated between lessons
🎹 For Students:
- Upload recordings of your exercises, pieces, or improvisations
- Track your growth over time and build a musical portfolio
- Receive feedback from your teacher, or the whole community if you want
- Explore what other students are sharing and get inspired
- Feel part of a wider musical world, even while practicing alone
TEACHERS
Teacher functionalities: step by step
1. Create a teacher account

-
Option A: During registration
-
Select that you are a Teacher..
-
The system will guide you through the process, and a teacher account with access to teacher-specific features will be created automatically.
-
-
Option B: From profile settings
-
Go to Edit Profile.
-
Scroll down to the bottom and choose Account Role: Teacher Mode.
-
Click Save Changes - and you're all set.
-
2. Access teacher features
-
Click the Teacher Mode button.
-
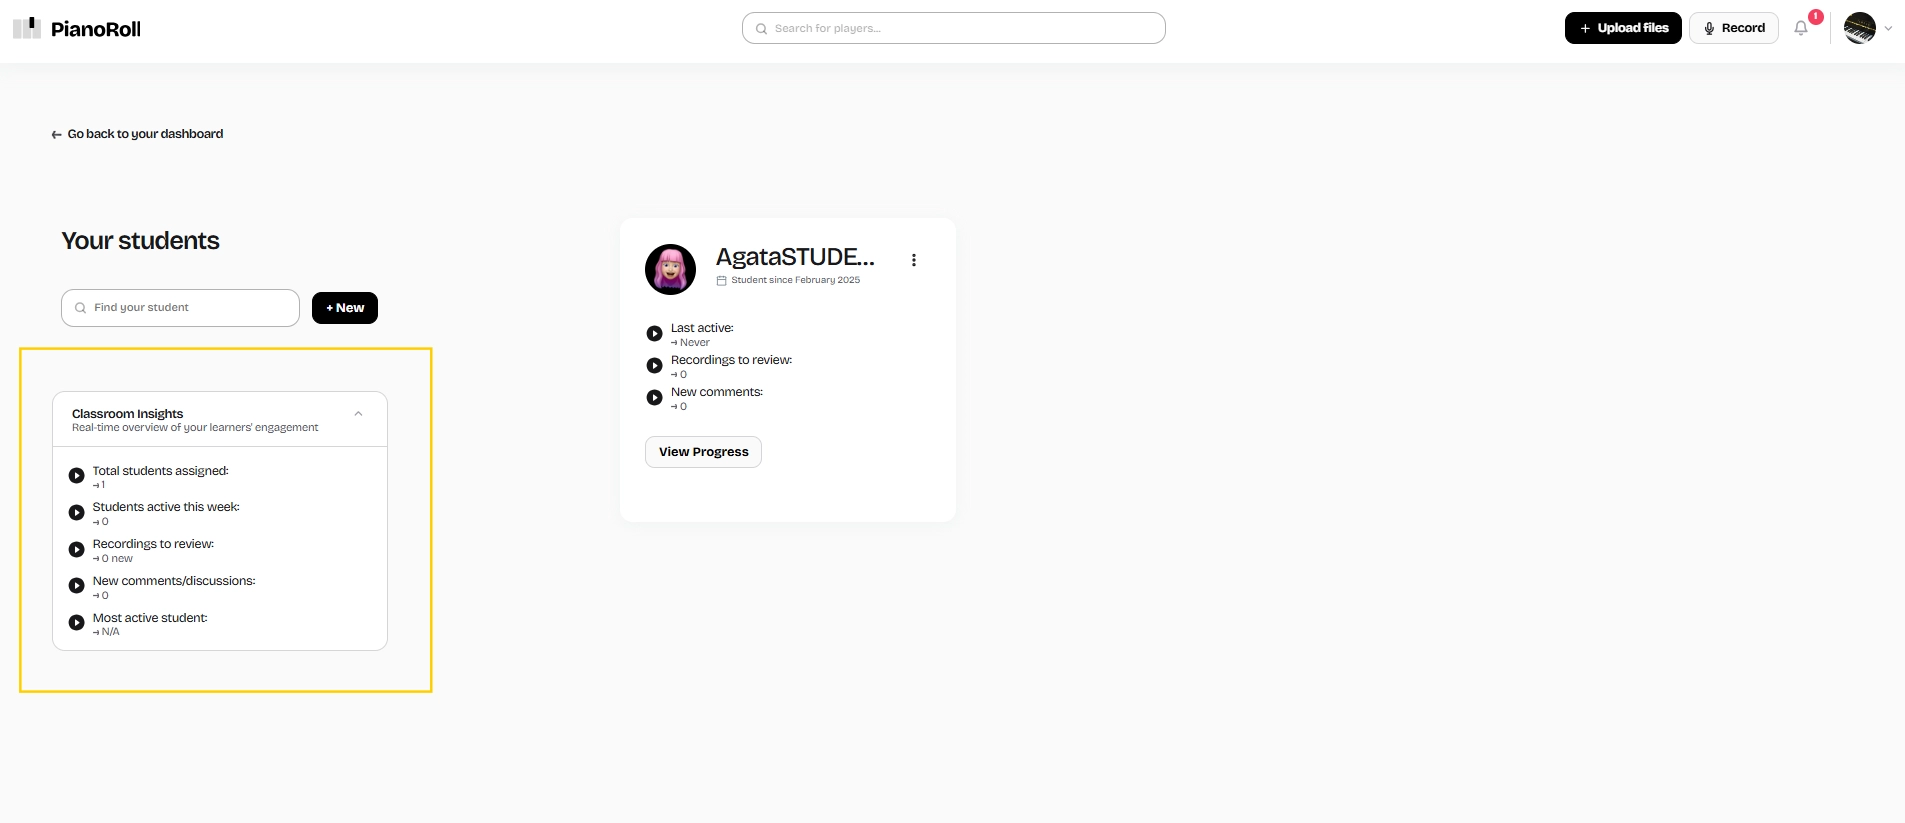
You are now in the Classroom Insights tab - here you'll see a real-time overview of your students' engagement.
3. Add your first student

-
Click “+New”.
-
In the add-student form:
- Enter the student's email address
- Add a short note (Optional)
- Click Invite your student
4. What happens next
-
If the student does not have a PianoRoll account:
They will receive an email invitation. After registering, their account will be automatically added to your virtual classroom list.
💡 Tip: If the student did not receive the email, check if the address was entered correctly and suggest they check their spam folder.
-
If the student already has a PianoRoll account:
They will receive a notification, which they need to click to accept the invitation. Once accepted, they will appear on the list.
5. After adding


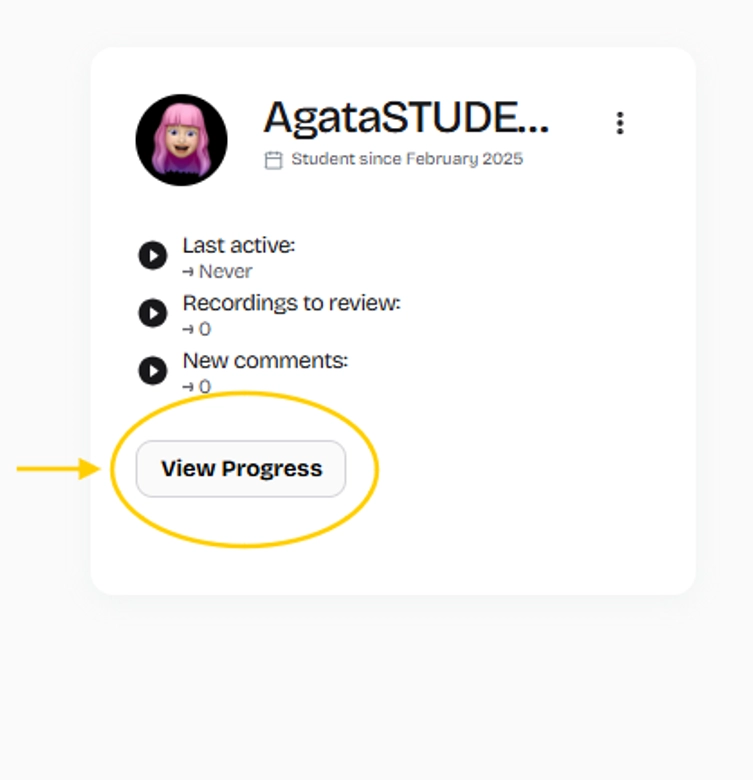
-
The student will be visible on the list in your virtual classroom.
-
You can now:
-
View this student's activity insights as last active, recordings to review or new comments
-
Click View progress to see detailed statistics
-
-
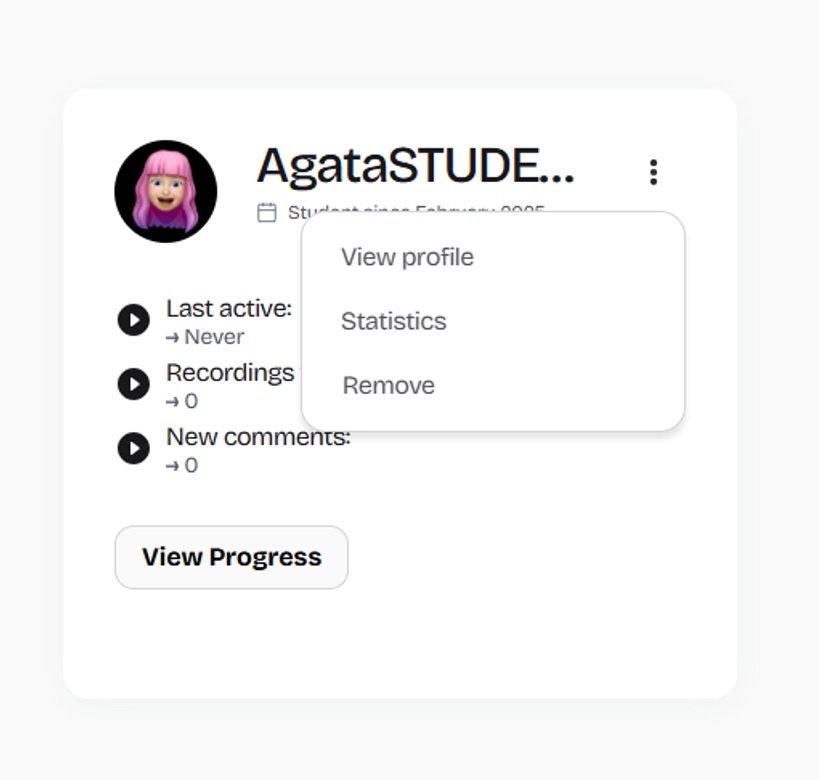
You can also use the menu by clicking the three dots in the top right corner to:
- View the student's profile
- Access their statistics
- Remove the student from the class (this will not delete their account)
6. Virtual Classroom
Added students will be now included in the statistics and insights shown in Classroom Insights.
7. Detailed Comments for Deeper Feedback
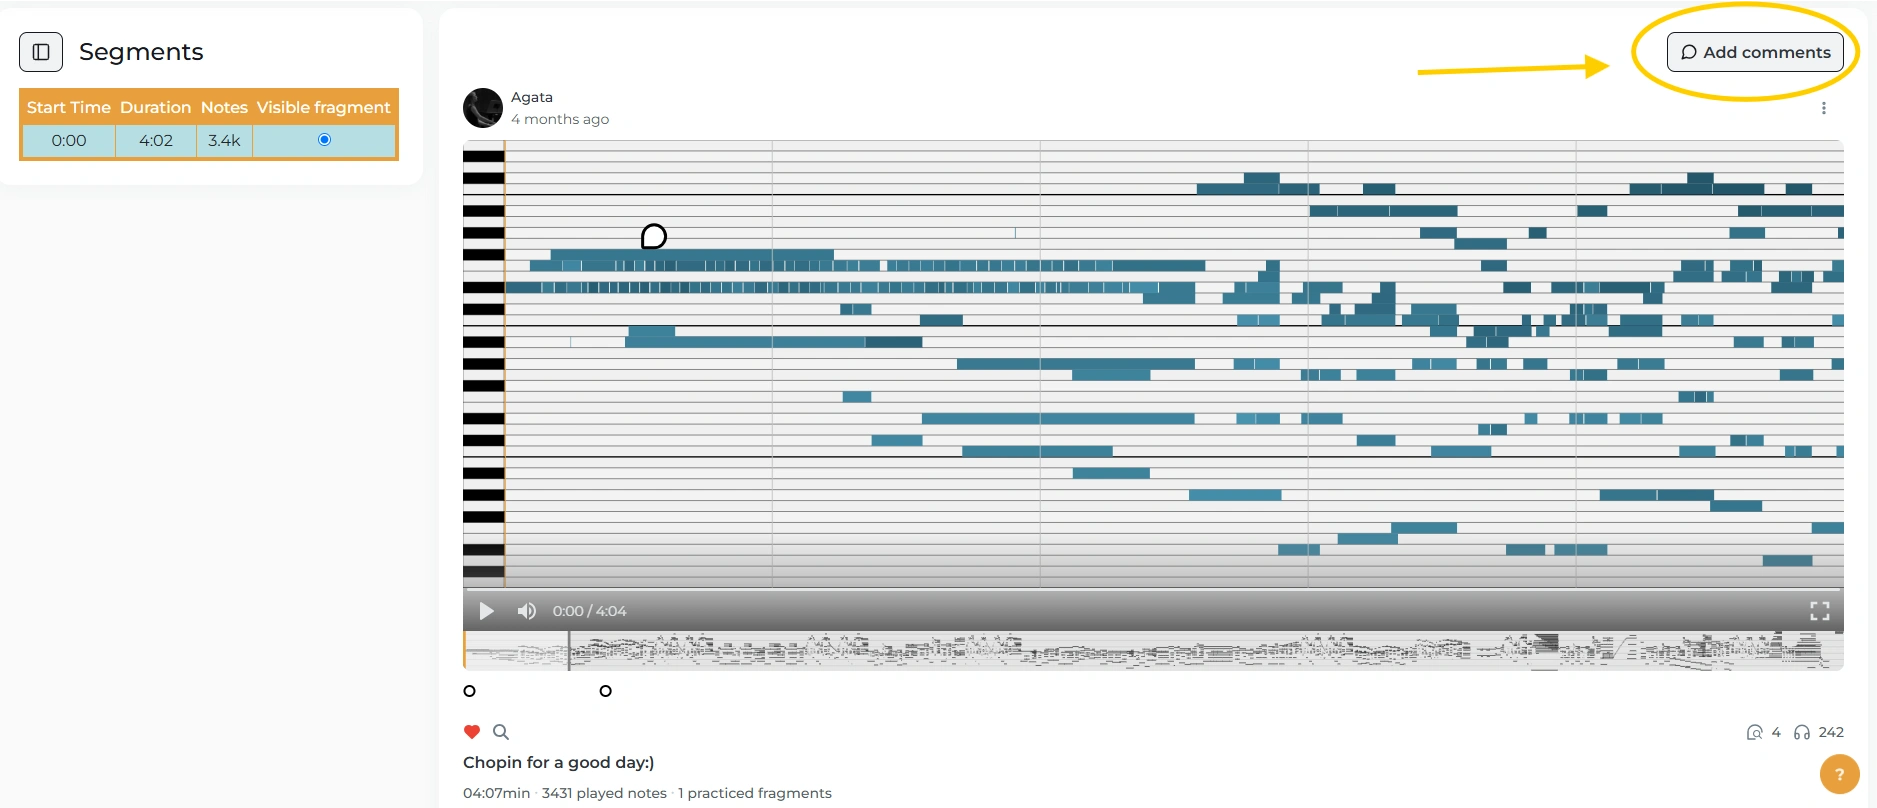
You can leave general comments under each post, but when you want to go deeper, PianoRoll gives you a unique tool: timestamped comments.
To add detailed comments:


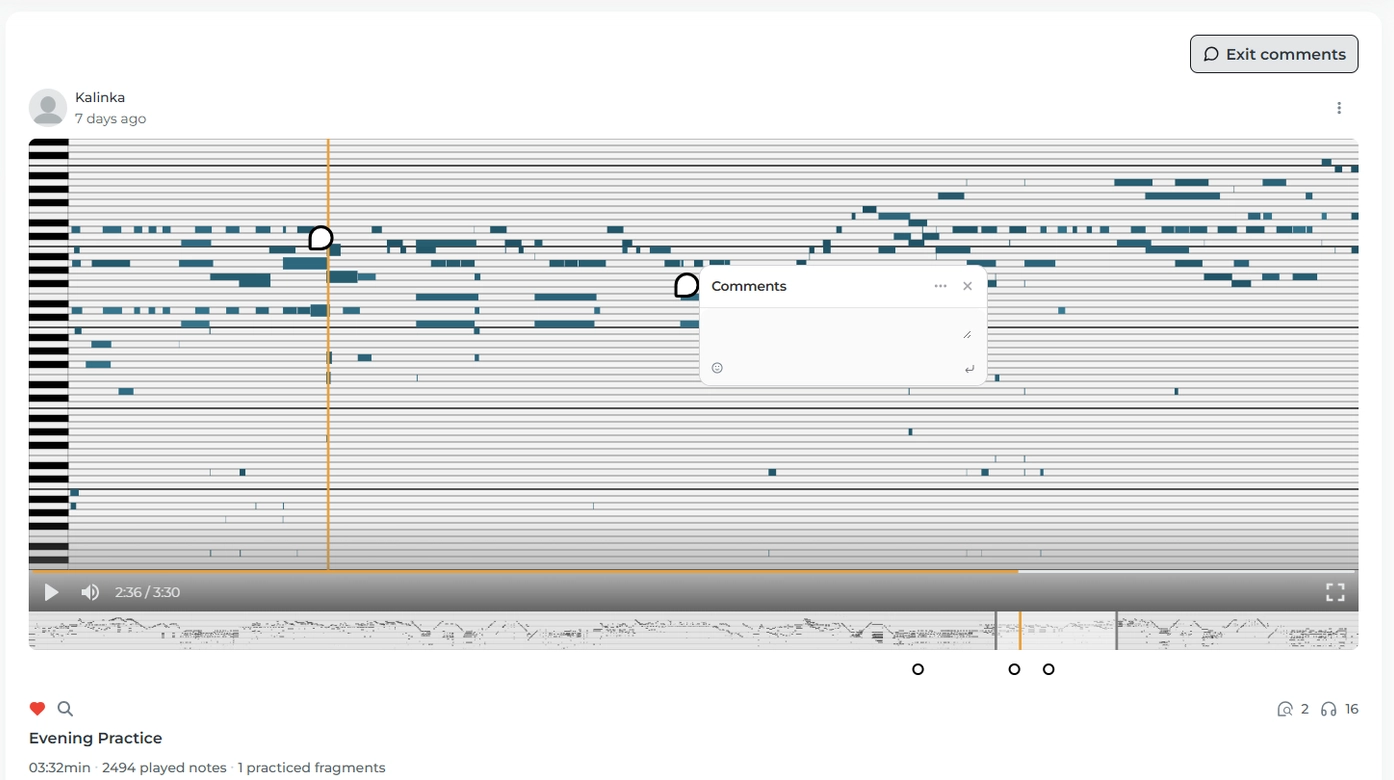
-
Go to the detailed view of any post (click the 🔍 magnifying glass icon).
-
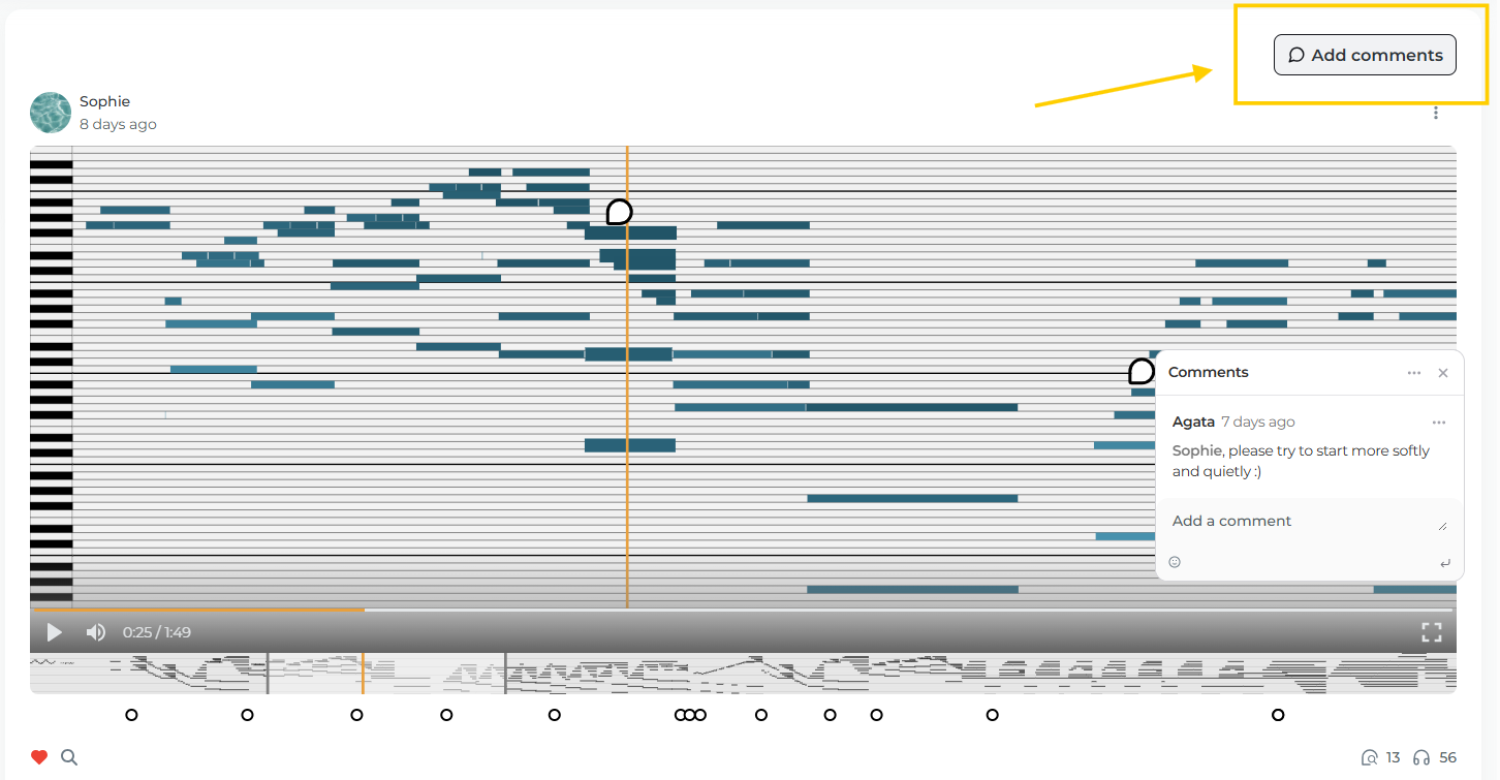
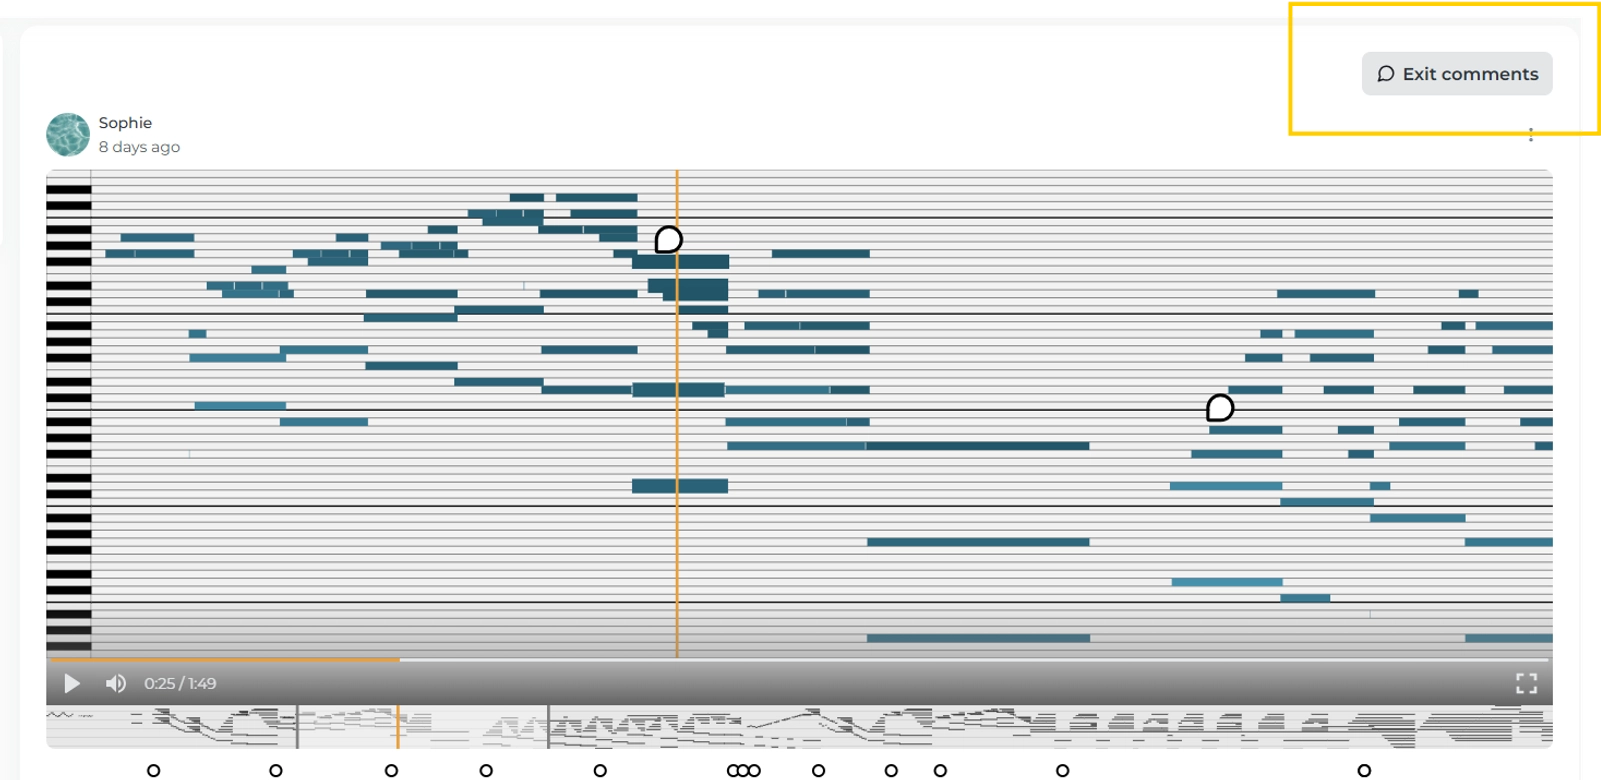
On the right side, click "Add Comments". This activates commenting mode.
-
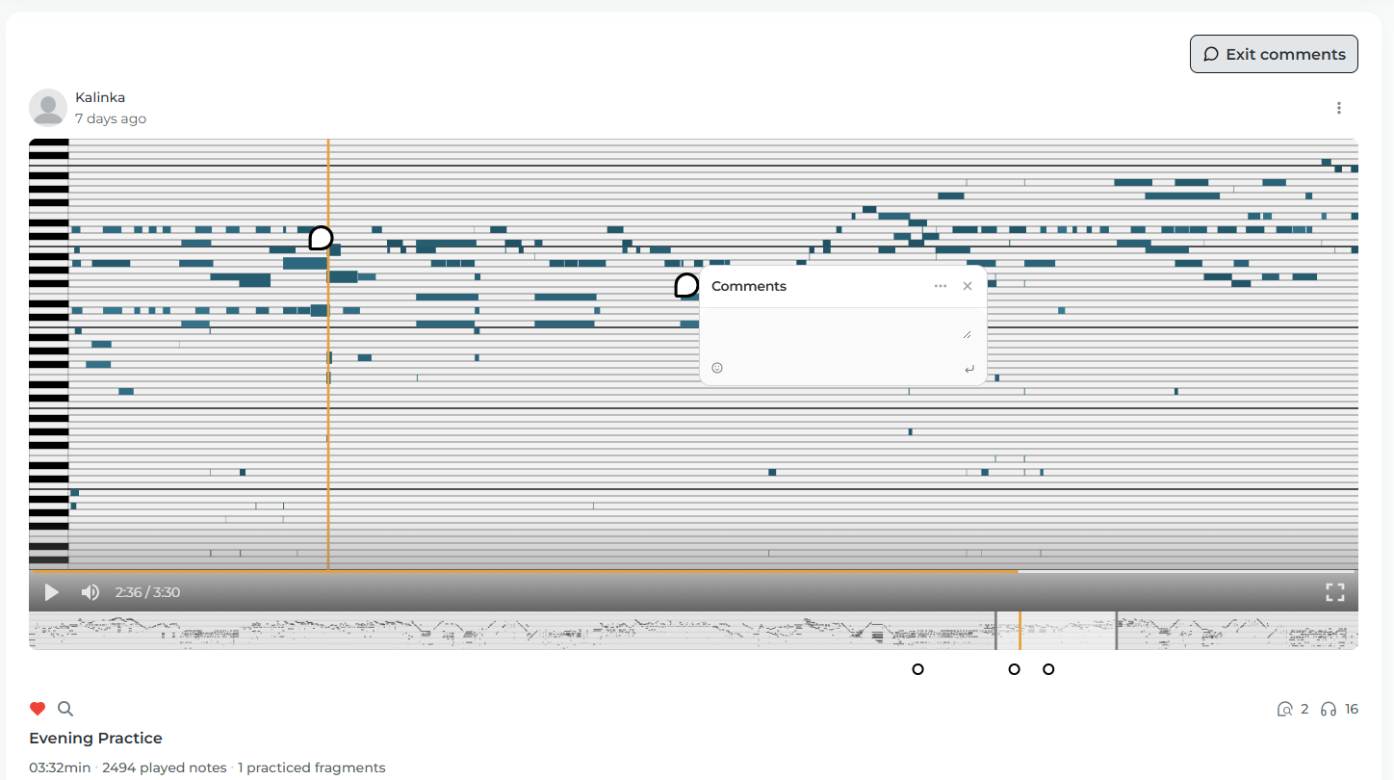
While the PianoRoll is playing, click on the roll at the moment you want to comment. Then you can write your message exactly where it matters in the music.
-
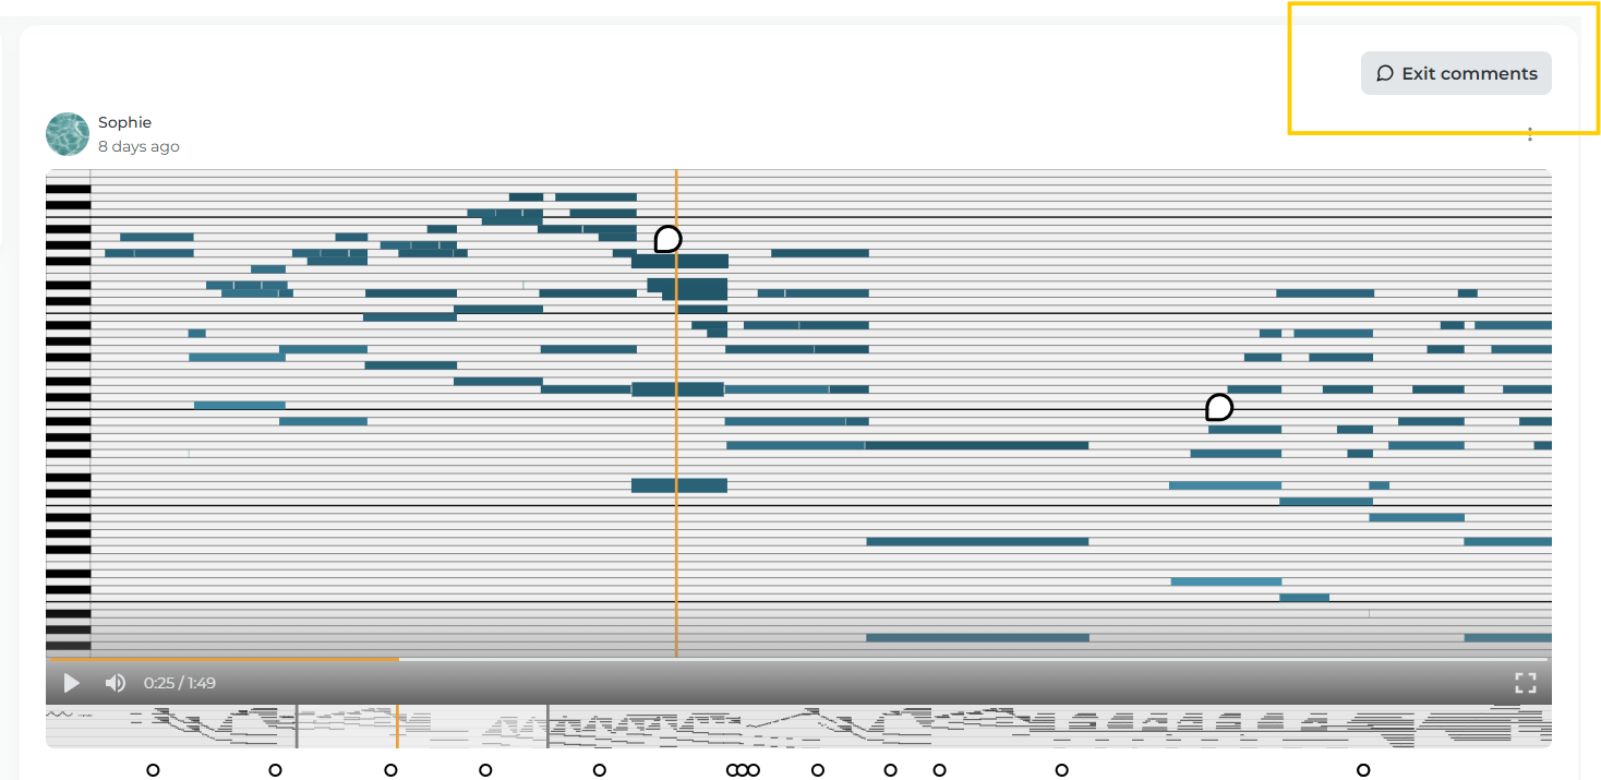
When you're done click exit comment mode.
-
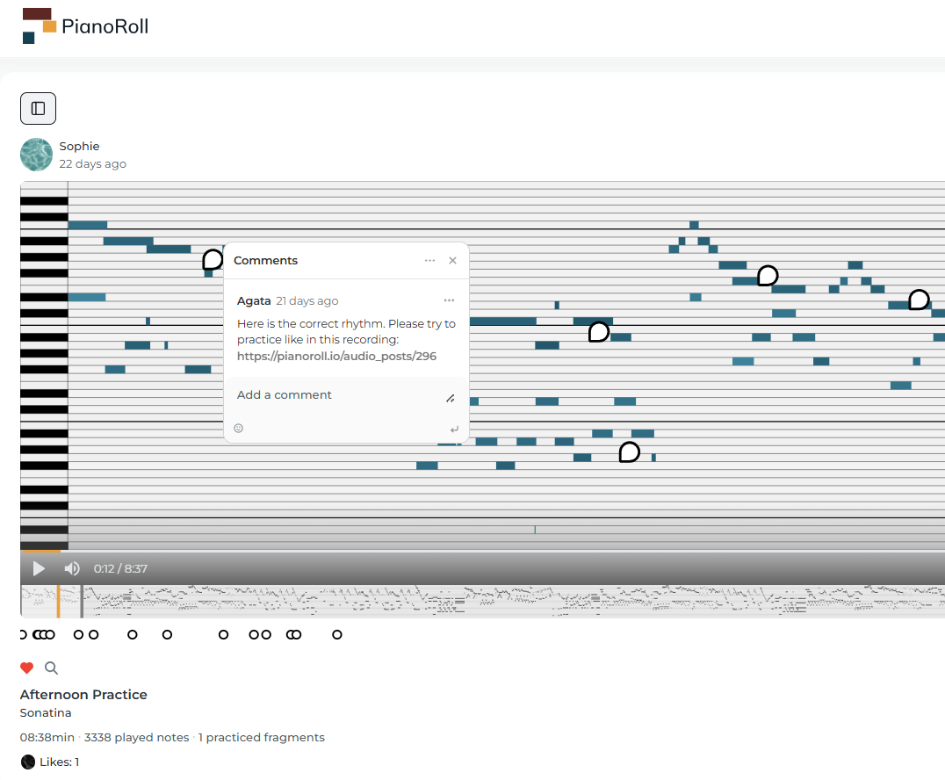
Now you and your student can see all the comments you've added as bubbles attached to specific moments in the recording. The student can reply to your questions or ask their own.
-
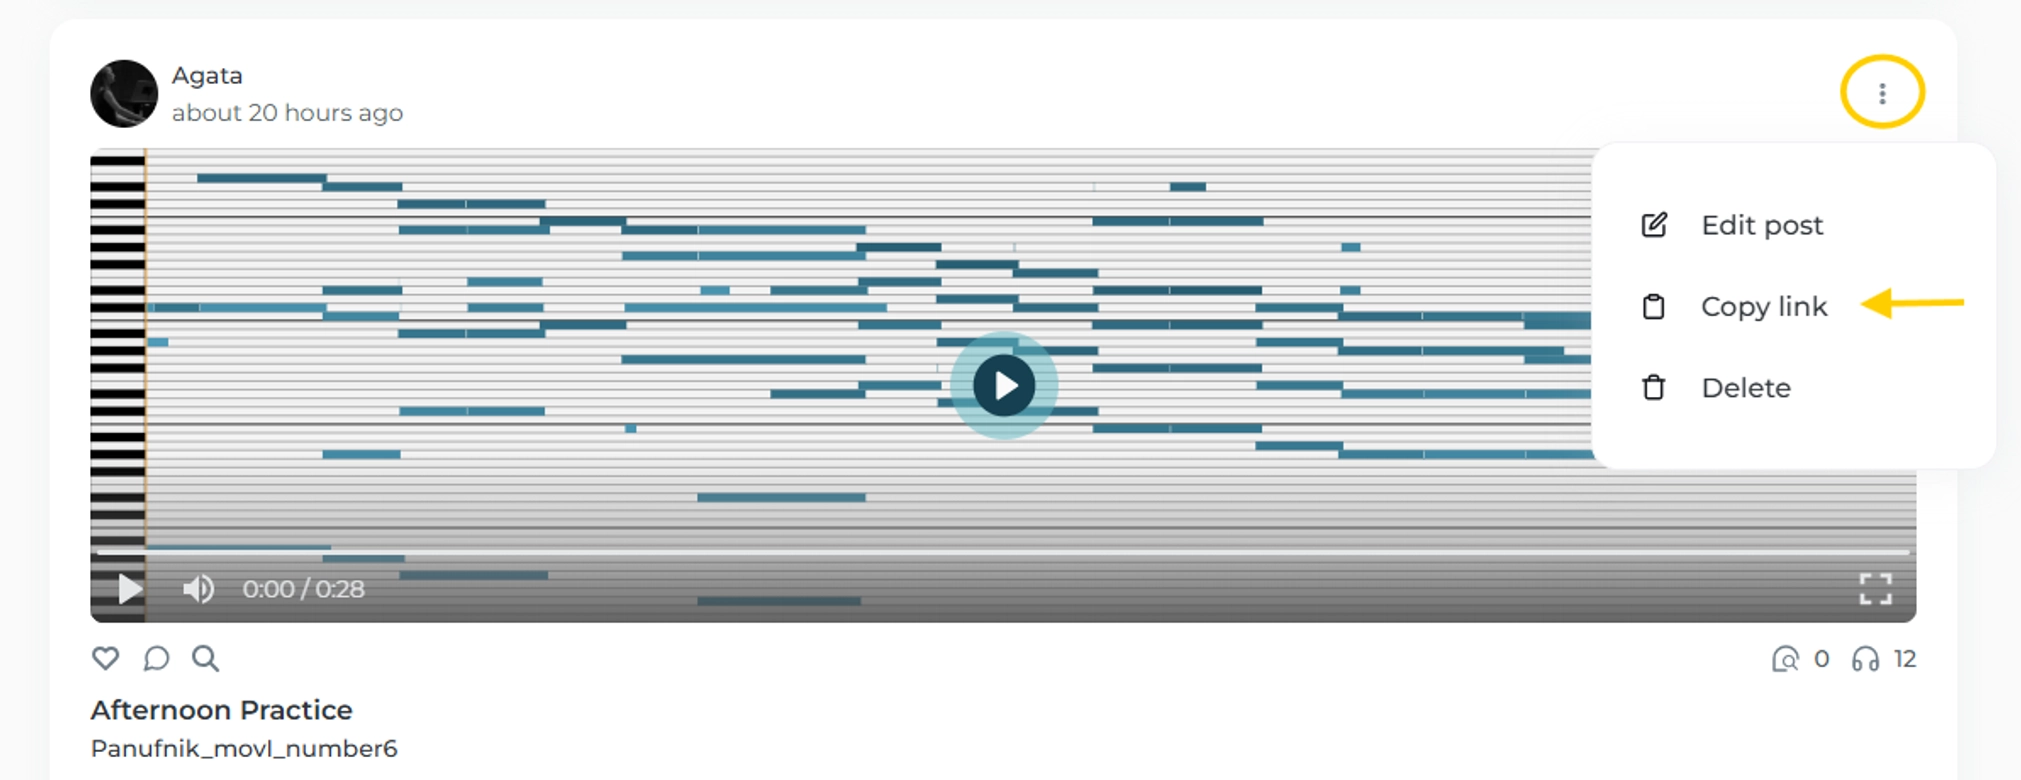
You can also include a link to your own recording in a comment if you'd like to illustrate your feedback with a musical example:
- Create a post ( see 👉 Record section or 👉 Upload section).
-
Click the three dots.
- Copy the link to your recording.
- Simply paste it into a comment, and you're all set!
-
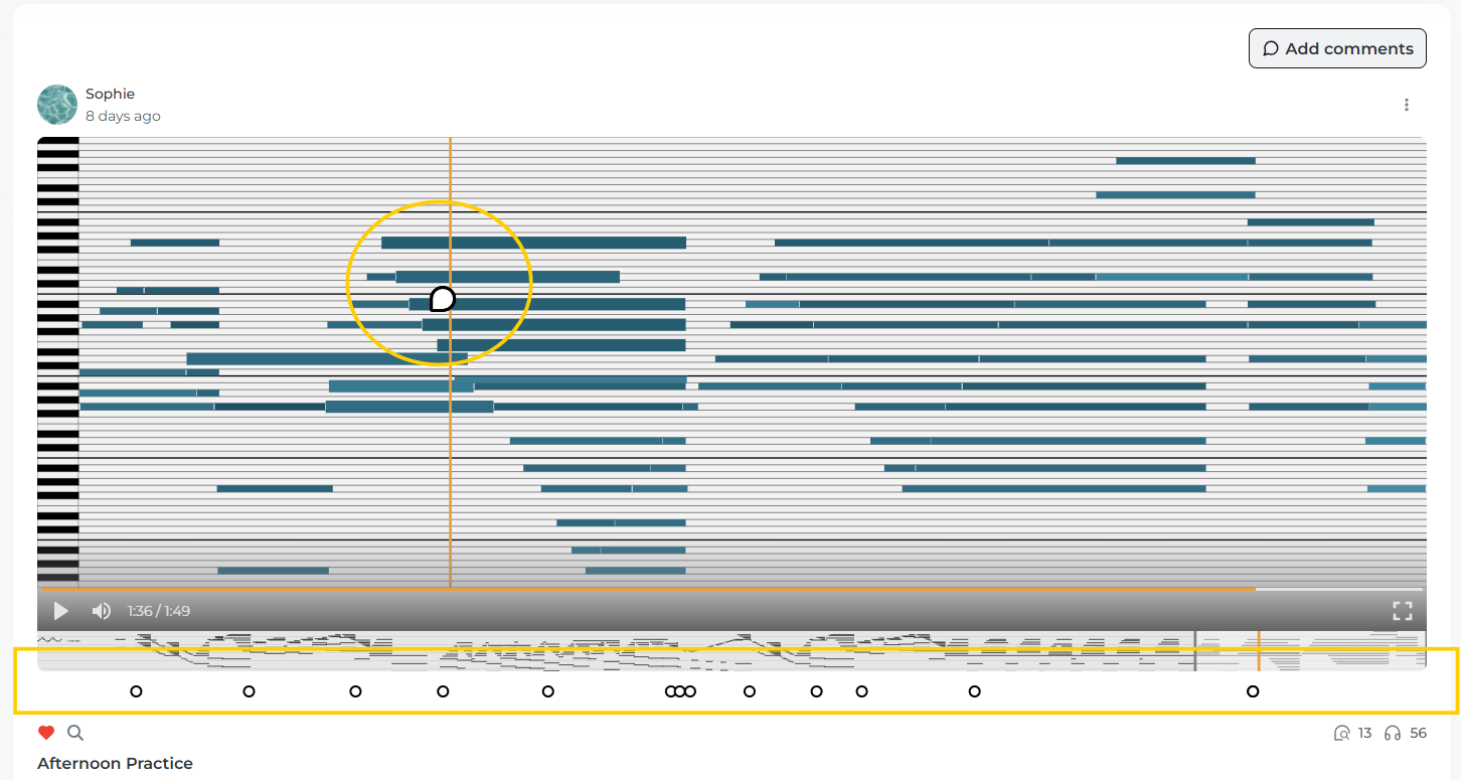
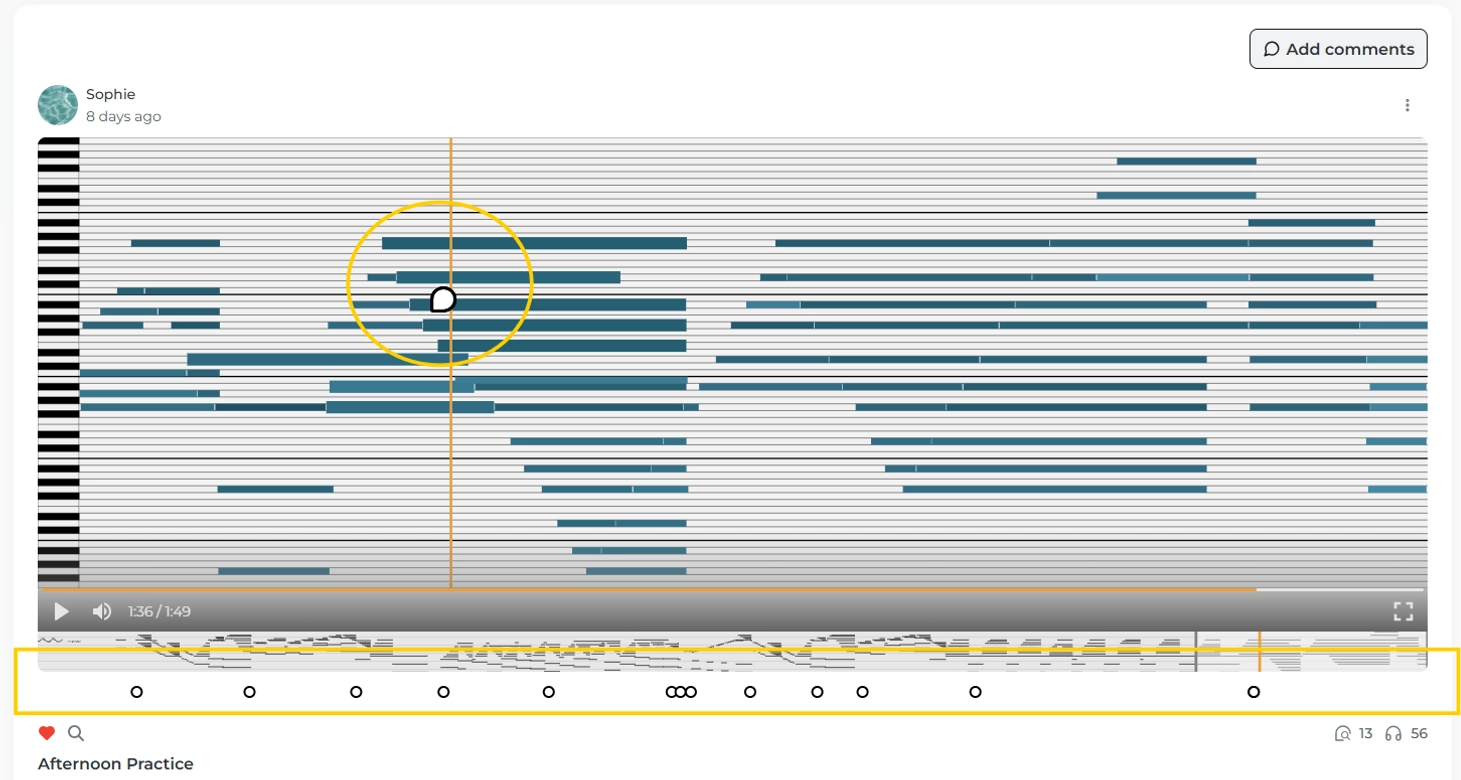
When you add some comments below the piano roll, in a detailed view you'll see little dots marking where comments have been placed on the timeline.
-
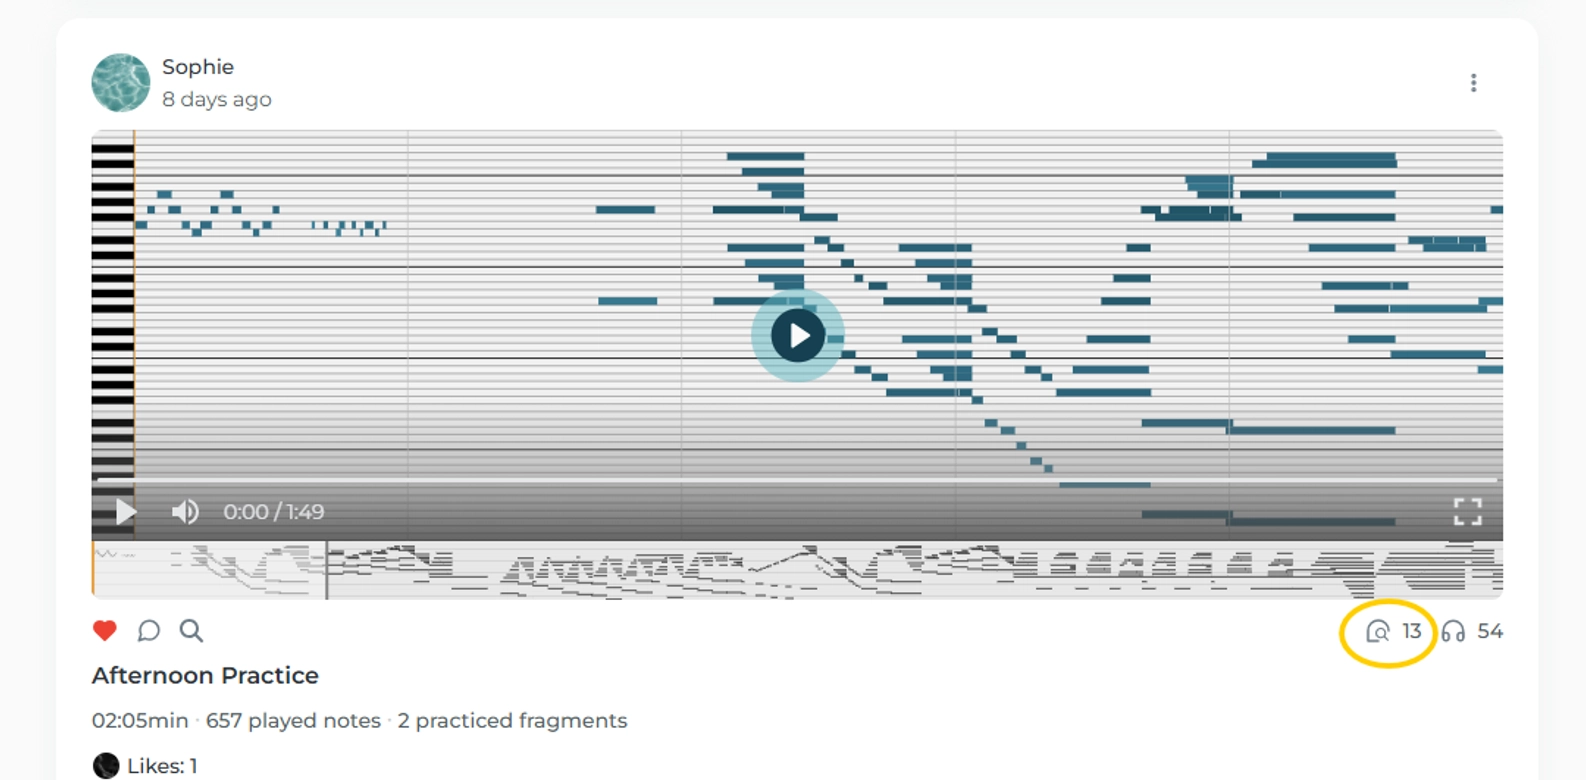
Finally, each recording with detailed comments displays the total number of comments, so the student can easily tell when it's worth opening the detailed view to read the teacher's feedback.
🎯 This feature helps you communicate clearly and efficiently.
- Students can replay the exact section, read your comment, and respond directly.
- Teachers receive instant notifications when a student tags them with questions like “How should I practice this part?” or “This section isn't working for me.”
- It's interactive, personal, and built to make remote learning feel as connected as an in-person lesson.
📩 Want to connect your teacher account?
Let us know if you need any help - we're here to support you on your teaching journey!
🎹 Piano Labels
Piano labels help you keep your recordings organized. You can create as many labels as you like- for example: Etudes, Practice, Concert Prep, or Needs Feedback.
When uploading a new recording, you can:
- Assign it to one or more existing labels
- Or create a new one on the spot
Each recording can have multiple labels, so you can easily group your practice sessions by:
- Piece
- Goal
- Stage of progress
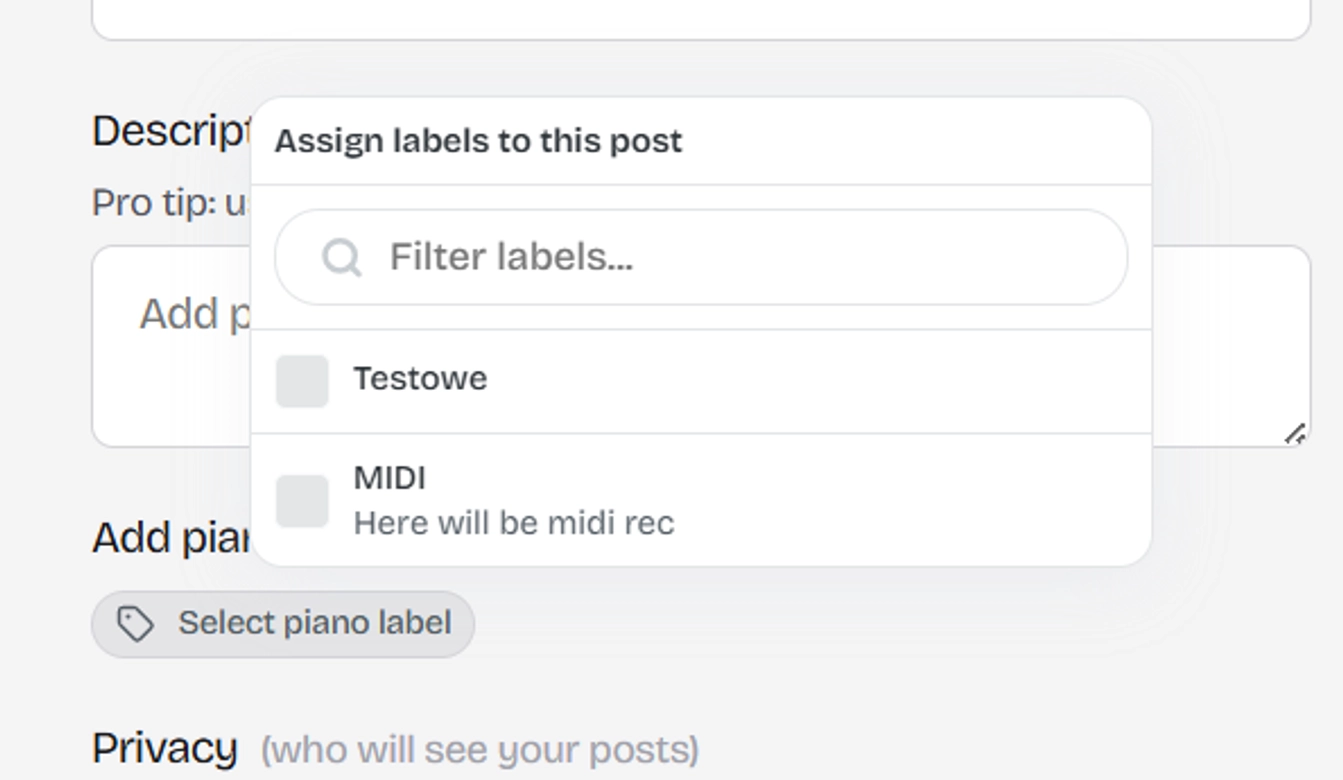
How to create a label:
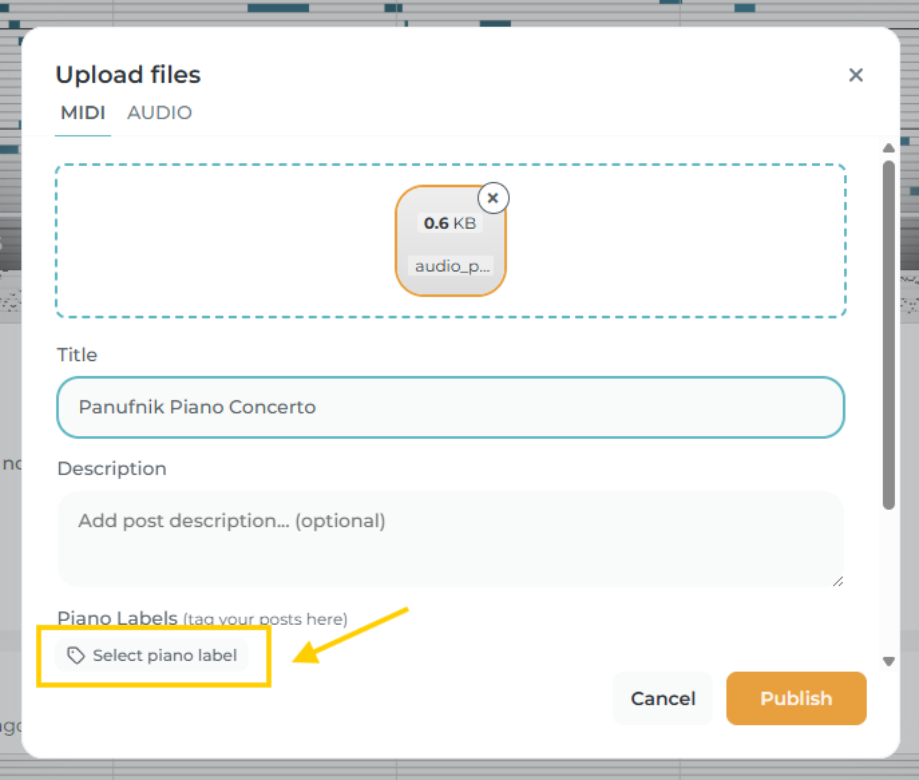
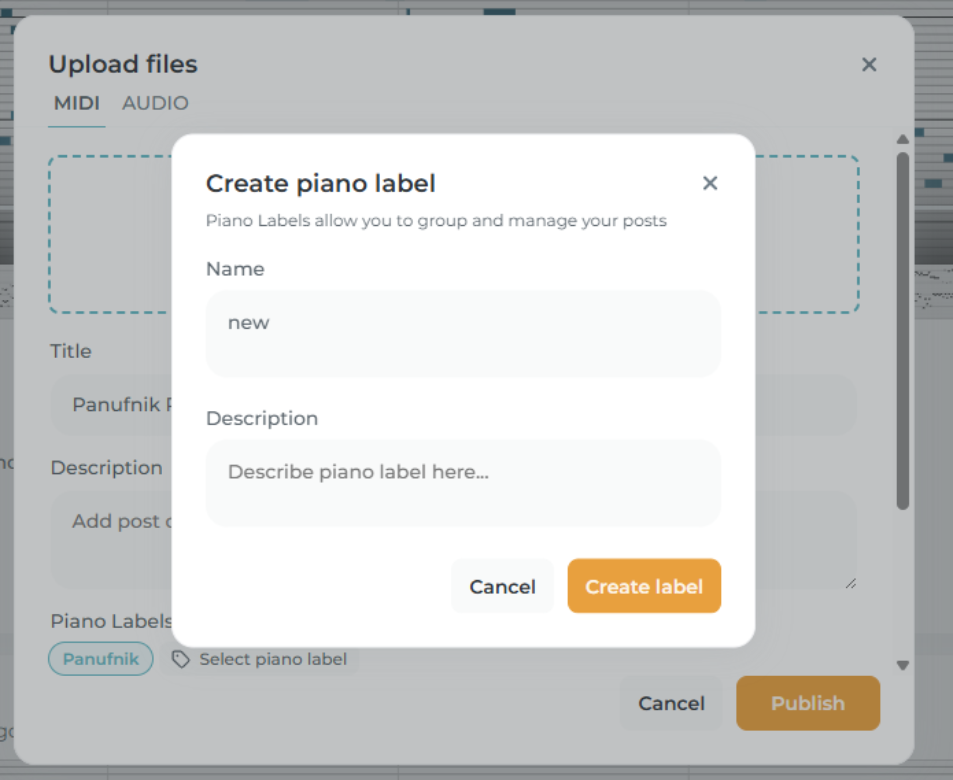
- Record or upload a file to create a new post (for more info see 👉 Upload section or 👉 Record section).
-
Click on “select piano label”.
-
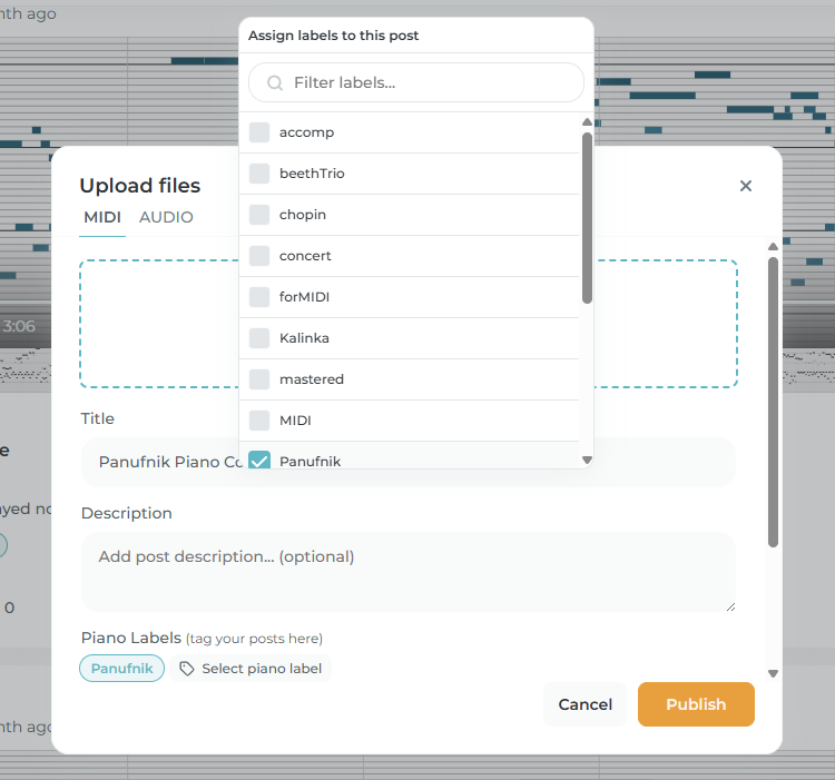
Select from existing labels by checking any number of boxes.
-
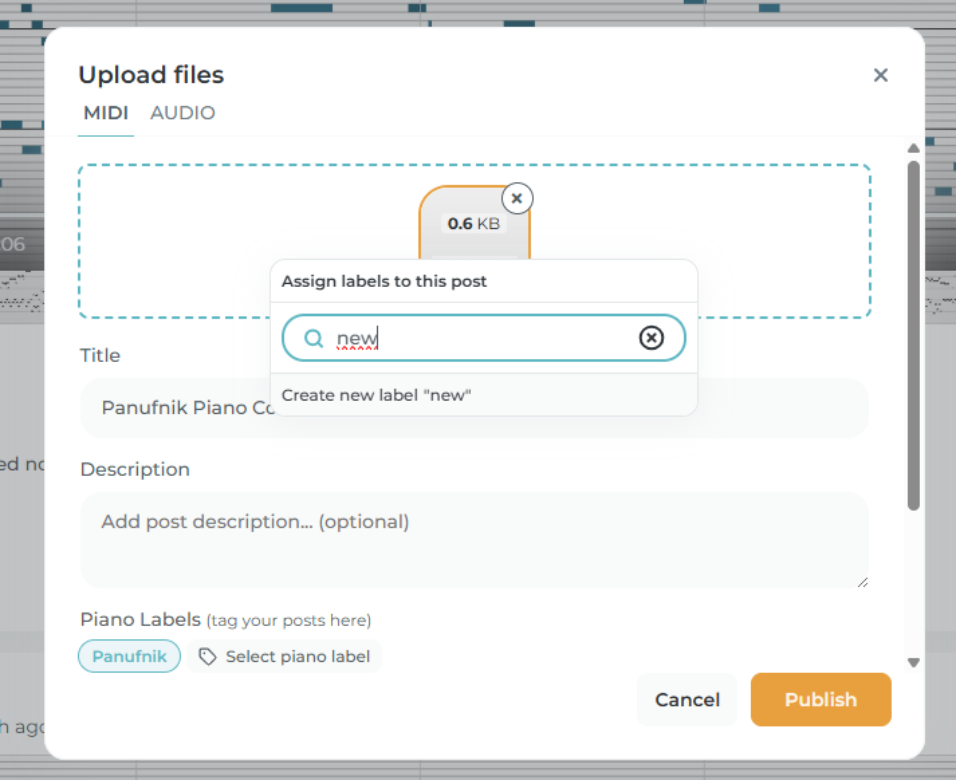
Start typing a new label name if you'd like to add a new one.
-
Name your label, optionally add a short description - and you're done!
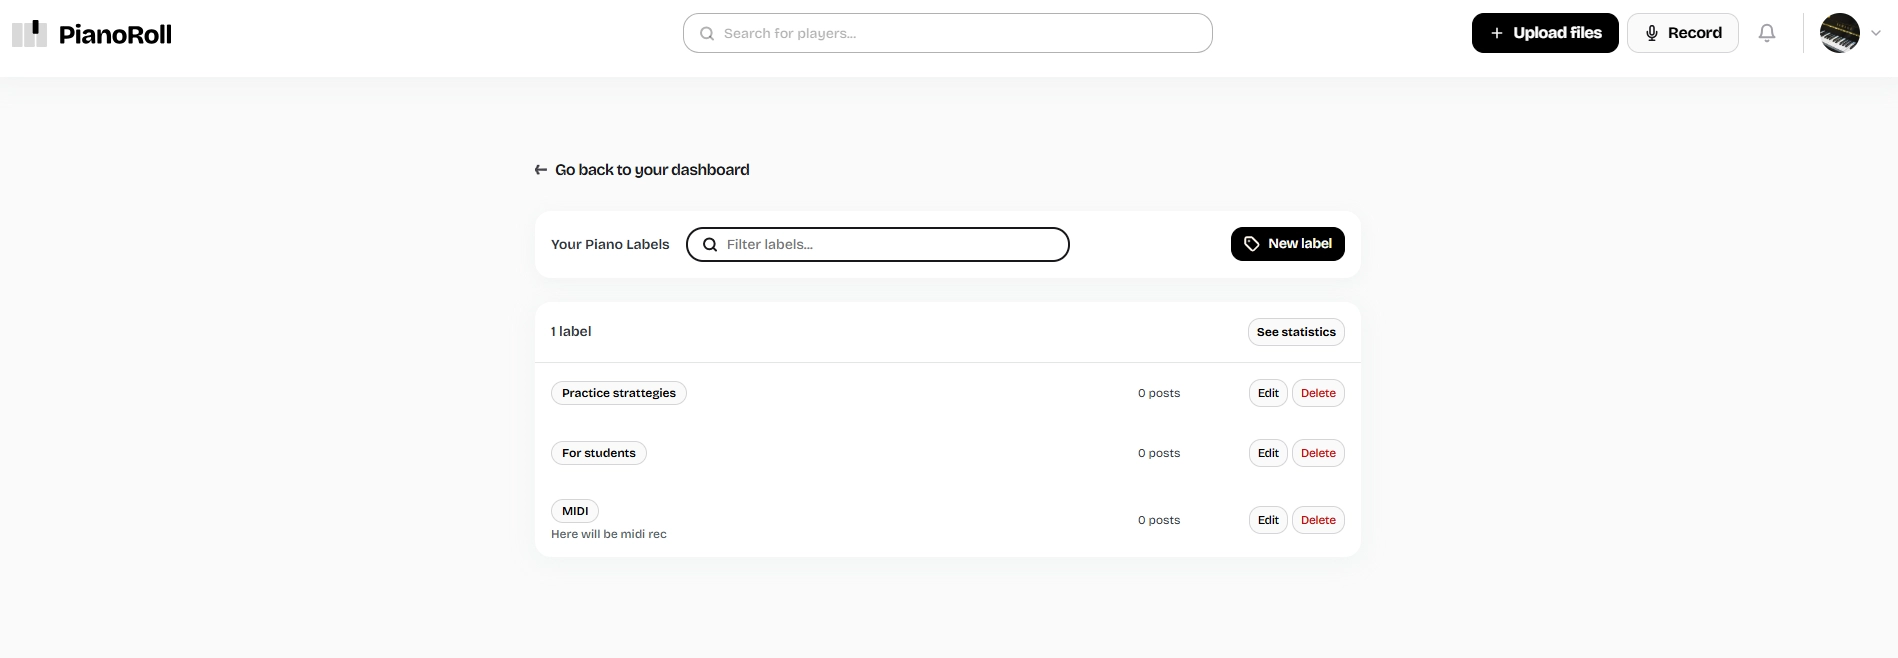
All your labels will appear on the right-hand side.
It's an easy way to categorize and organize your recordings.

When you click “Piano Labels” you'll get a full list of them, where you can also delete some or add a new one.
Stats
Discover completely new possibilities for musical analysis for yourself or your students. With these tools, you can track and analyze your progress- how much and how you practiced over the week or month, with or without breakdown by individual pieces. This insight helps you understand your practice habits and focus on what matters most. For teachers, they provide a valuable tool to motivate students and tailor lessons based on real progress data.
Step by step:


-
Click the See Statistics button.
-
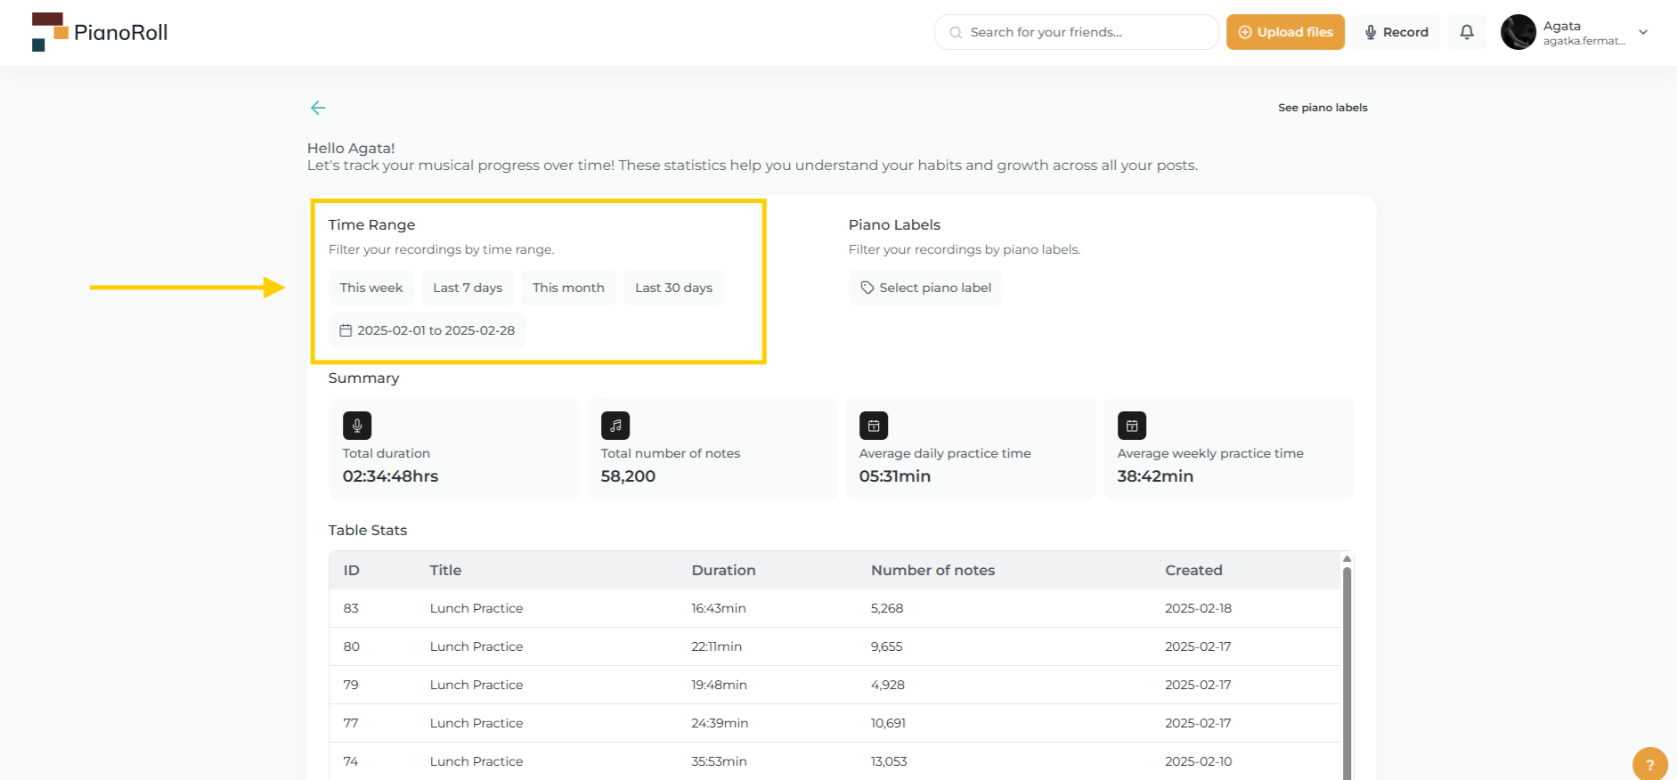
Here you can follow your musical progress. Firstly choose the time period you want to explore.
-
Choose a predefined filter like This Week, Last 30 Days, or select a custom time range by marking it on the calendar.
-
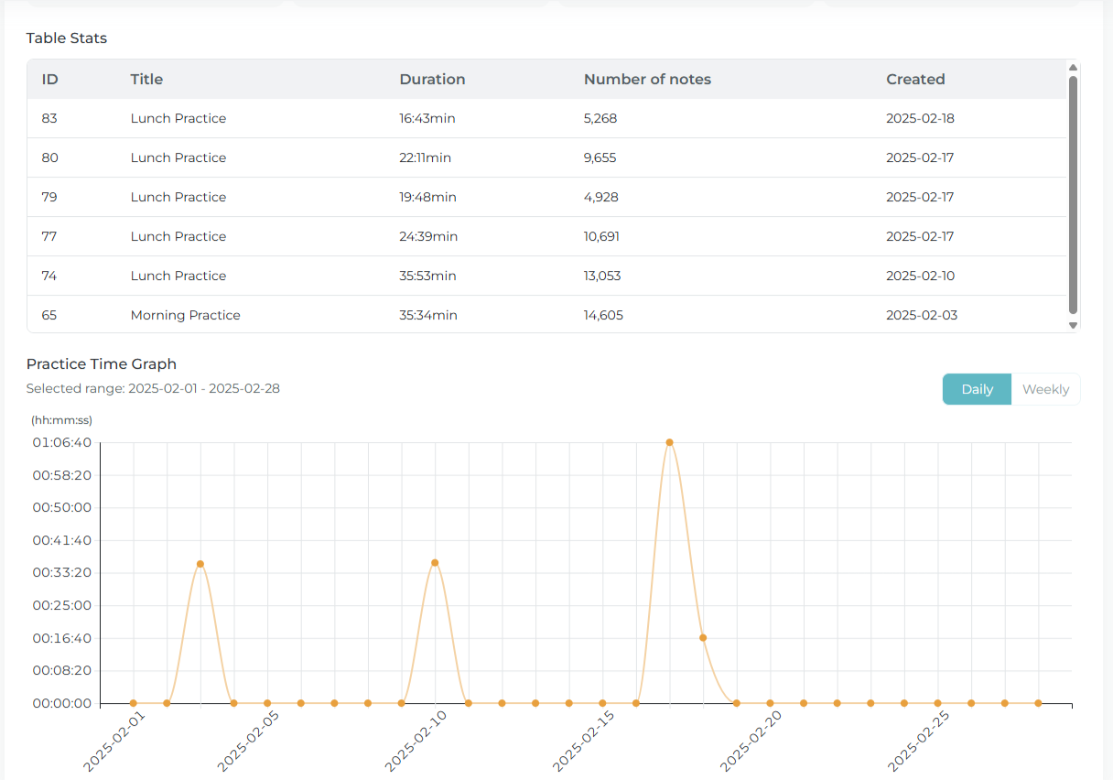
View your stats presented as clear, easy-to-read charts.
-
If you want to review details of a specific session, simply click on its representing tile:.
-
Want to filter stats by pieces? It's easy- limit them to specific piano labels (learn how in the Piano Labels tab).
If you want to learn more or aren't sure how to use a feature, remember that you can always click on our question mark icon- it will take you to the User Guide and provide helpful instructions.
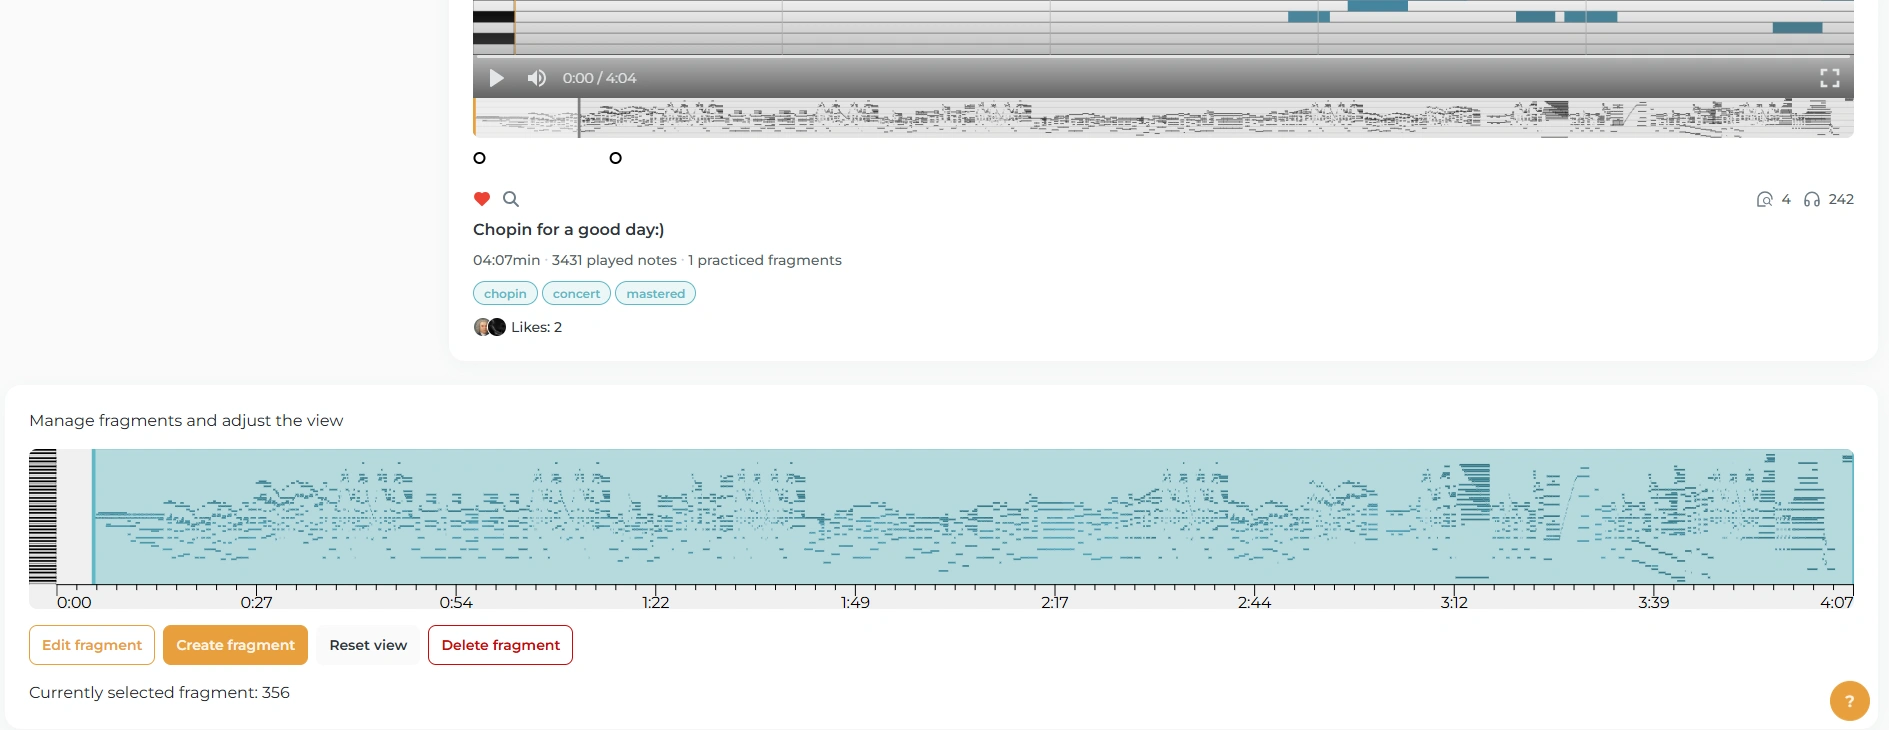
Managing Piano Fragments
When you add a post, whether by recording directly in PianoRoll or uploading a previously recorded file, a piano roll is created from it. You can upload recordings of any length, but the piano roll will only display a selected fragment of the recording.
You can control which part of your recording is shown in the piano roll, or leave the default selection made automatically by the app. To view the full recording and choose a different fragment, click the magnifying glass icon below your post.
You'll be taken to the Details View. Let's take a closer look at what's available there:
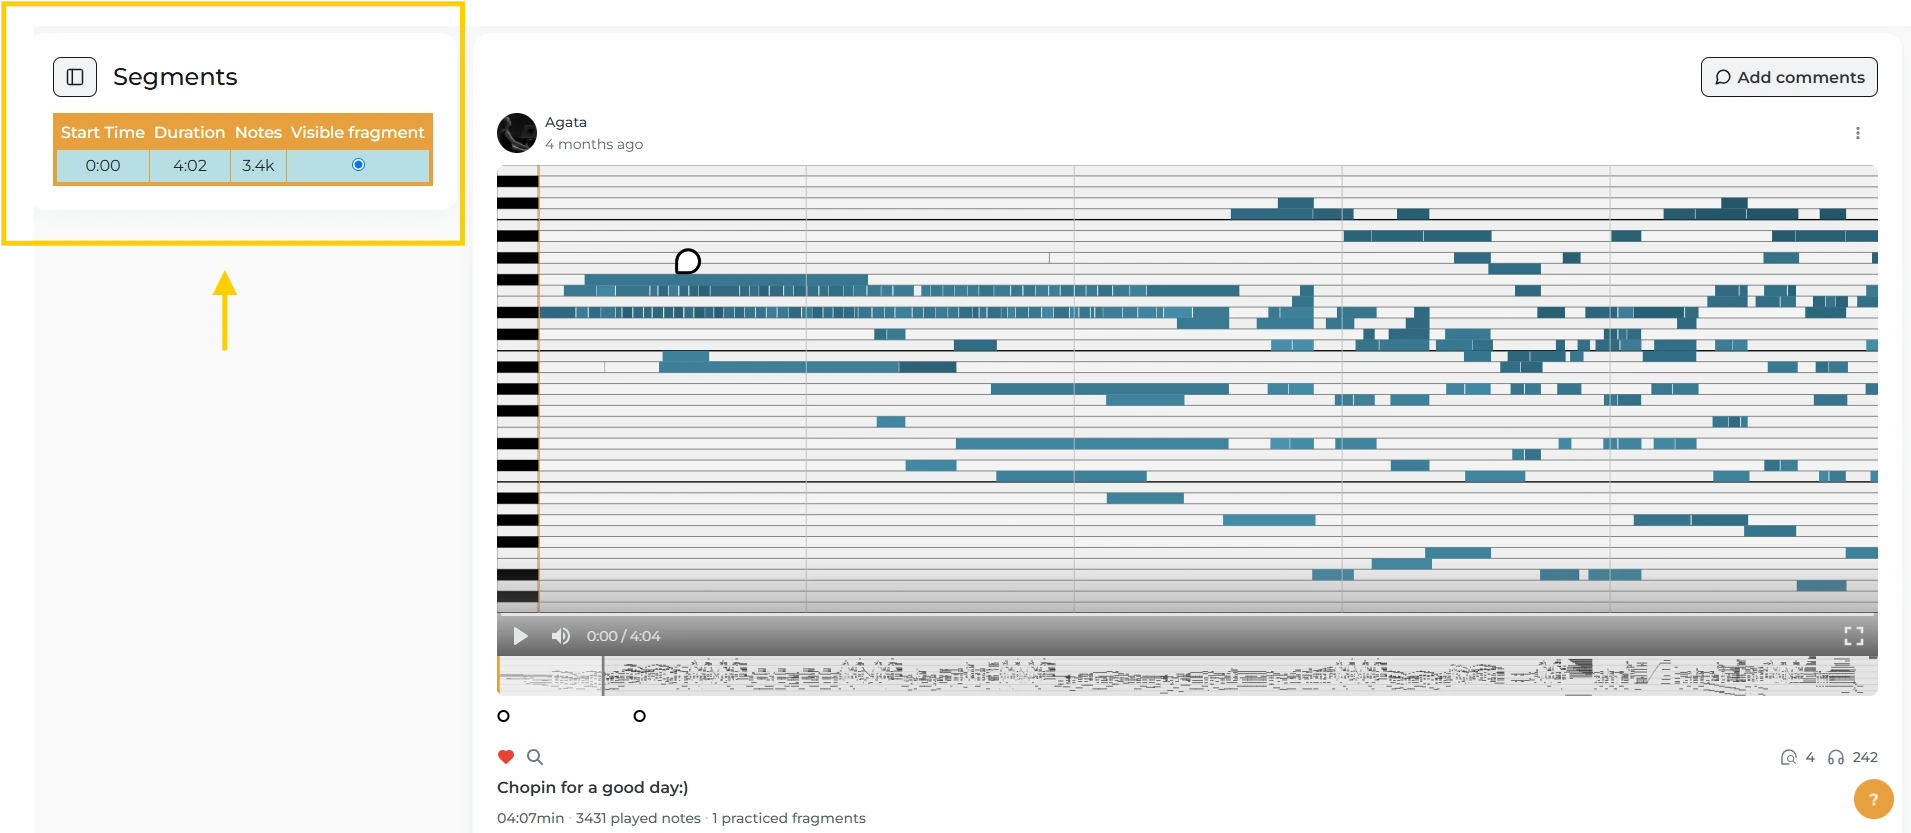
-
Sidebar: To show or hide the segment list, simply click the button on the right.
-
Segments List (on the left): A list of automatically generated fragments based on your recording. You can select from this list and decide which fragment will be displayed as a piano roll.
-
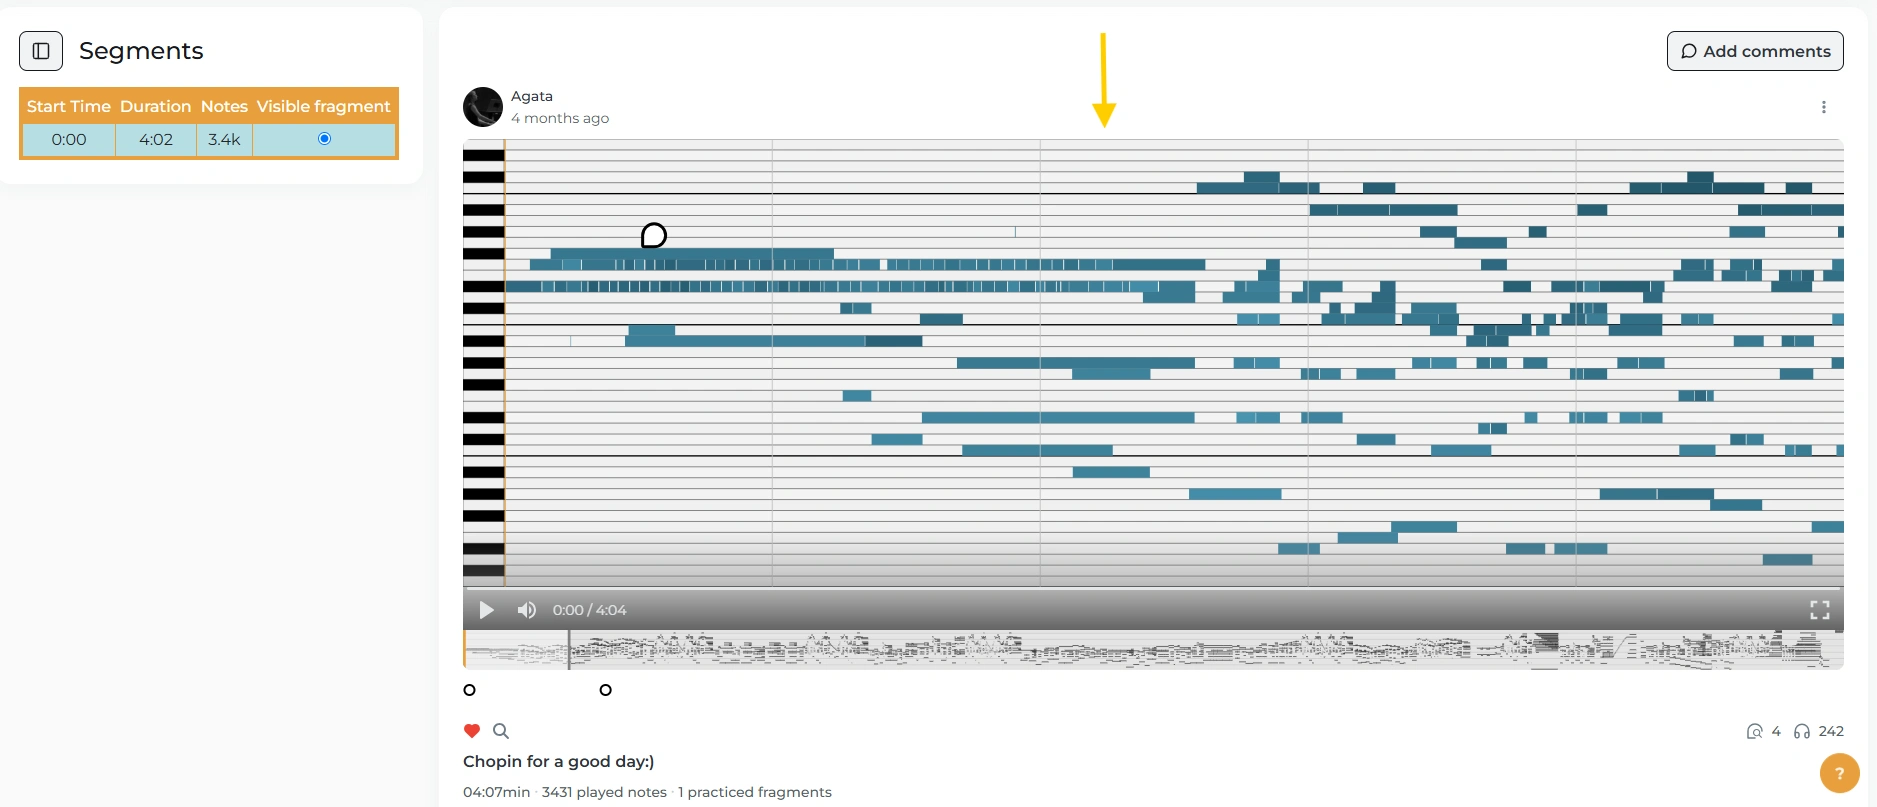
Fragment Preview (center): The currently selected fragment is always visible in the middle.
-
Comments Section: You can add or read comments related to the fragment. To learn more please visit Teaching Section.